Monday 29 June 2015

Transplanting plants in to the pots and Ground


The best time for the plants in the field, to transfer them into the pot, or that the first pair of leaves only, the child, as long as they sprouted. Although the plants are transferred to larger and more difficult level of competition. Translations soccer or continence may be mixed with clay.

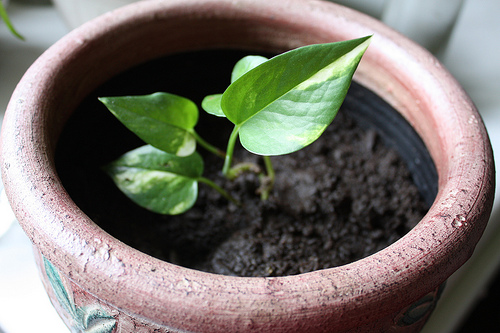
First of all, Fill the waterpots with the earth that is dug, mixed with organic fertilizer. When transplanting seedlings need quite a fresh pot filled with soil. In the event that the plant is to carry out only a very little older, a man's thumb, to the pot as the rest of the plants of the earth shall be filled with earth. Add water to the earth, and shall strip it, the hour.

Carefully dig planting. The seeds of a number of young men between the thumb and the finger, and the stems, as they are delicate and easily damaged. Make a small hole in the land of the bud, to destroy the fingers and press down.

Carefully Keep the pots near a window. If there is, that a plant it with plastic wrap and cover the heaven all the sprinkling of water, the days of wilting, and commanding to abstain. After a few days, remove the back cover plants window.transplanting


 Plants that have been growing in position for more than five years are much less likely to survive transplanting than younger specimens it is as a rule-of-thumb, Young plants transplant fairly well, but for big, more established specimens will suffer greater stress and require advanced technique.


 Secret tips for  transplanting on the ground .

1.Dig and/or transplant when it is overcast or during the cooler evening hours.

2.Never leave the roots exposed to sun, heat or wind. Don't remove all plants from their pots and place them in the garden. Remove just prior to planting.
3 .Summer is never the best time to move or transplant garden plants. The sun is too intense and the heat is relentless.So try to avoid summer.
4. Before your transplanting water into the hole.
5.Place the transplant into the hole and fill it halfway with water. Allow the water to settle the soil around the roots and then finish filling the hole.
6.Lightly feed with bone dust and horn dust around the soil around the time of hole transplanting.
7.Don't water the whole plant, leaves and all,
8.Try to keep light shadow if the plant is so baby.

Every day should check the plant, for the first couple of weeks.

DIRECT SOWING OF SEED


Direct sowing is much cost effective than another method of planting.Though it is not a full proof method for some plants it's very easy and mostly prevents plants damage, like root damage and etc.

There is some process of direct planting on the ground.
The drill/through process

Dig a trench about 1-1/4 inches deep. 


Sprinkle the seeds lightly and evenly along the length of the trench. 
Check the instruction on seed cover before applying seeds. 
Gently cover up with a light layer of soil. 
Water the seeds gently. 

The Broadcasting process
It is the best process for winter season plants like root plants(carrot, radish etc)when the mud-bed is ready just gently speared seeds all over it and water it.


Done.


Sunday 28 June 2015

PETUNIAS SEEDS GERMINATION & GROWING


 Sowing:
To sow seeds in the house, from February 8 to 10 weeks before the last frost. Petunias bloom in the morning and covered with flowers are stunning. They like the sun and often bloom within two months from seed and continue throughout the season until killed by the frost. They are easily cultivated, requiring rich soil and full sun. They grow best in high-moisture areas with well-drained soils but can adapt to most soil types. For Established the plants need less maintenance require dry weather than other plants.
Seed 6 mm (¼ inch) apart in rows 7 cm (3 inches) mm, that's for sure stand (especially the corners), so it is not eaten with irrigation. Do not cover the seed, as the seeds need light to germinate.
Provide light and constant warmth of 21 to 27°C (70 to 80°F)   respectively. In fact, the heat source from bottom to the use of the best results. F2 hybrids tend at the end of the previous germinate much better at about 27c (80f).  F2 hybrids tend to germinate better at the higher end, at around 27C (80F). The soil temp should not fluctuate and must not drop below 21°C (70°F). Finely mist and cover seed tray with plastic or paper to conserve moisture.

Need to check the compost for dryness regularly.  Add a little warm clean water from below, if this is the case, being careful not to over water. Don't use too much water, can die seedlings, as it can spread "damping off fungi", and encourage other moulds and diseases.

Germination:
  Usually, seed takes 10 to 21 days for germination and it depending on soil and temperature conditions. After sprout, the seeds remove the cover as soon as possible. Keep moist but do not use cold water as it lowers the soil temp and weakens tender seedlings.
  Transplant and grow on in cooler conditions, around 13 to 16°C (55 to 60°F) for stocky plants when seedlings are large enough to handle.  Acclimatize to outdoor conditions for 10 to 15 days before planting out after all risk of frost, 30cm (12in) apart in a sunny spot on the light well-drained soil. For pot plants, transplant the seedlings into 7.5cm (3in) pots, grow cool, well ventilated and give plenty of light, but shade from direct sun.

Cultivation:
When plants are 5 to 10cm (2 to 4in) tall, and the ground is warm, transplant to their final positions in pots or into the garden, spacing 20 to 30cm (8 to12in) apart. The plant should be a full sun location. They will tolerate light shade but blooming will be reduced. Use a low-nitrogen/high-phosphorus fertilizer sparingly. Do not over-water or over fertilize, Over-watering will kill the plants.
After planting into baskets, when established give them a good spray from a watering can. The weight of the water flow will produce a perfect cascading habit.
Pinch or shear when 15cm (6in) tall and keep faded flowers picked, for denser plants and more flowers,
Petunias are sticky and will attract greenfly so keep an eye on them. Don't over water in the winter and keep them well ventilated.

Site and soil:
The most important requirement for growing petunias successfully is a location with plenty of light. Petunias need at least five or six hours of good sunlight; they'll perform even better when located in full sun all day. The more shade they receive, the fewer flowers they'll produce. Impatiens are a better choice for blooming in shady places.While soil needn't be terribly rich to grow good petunias, it must drain decently. It's always useful to improve the garden soil by conditioning it with organic matter, such as baled peat moss, well-rotted leaf compost or manure.Spread the organic matter two to three inches thick. Then incorporate it into the soil to a depth of eight to ten inches, using a rototiller or garden fork. This helps open up heavy clay soil, which improves drainage but can also increase the ability of light, sandy soil to hold moisture and nutrients.


Fertilizer and water:

Work a balanced fertilizer such as 8-8-8, 10-10-10, or 12-12-12 into garden soil at a rate of two pounds per hundred square feet. Later--early to mid-July--begin to use liquid fertilizer every three weeks (weekly for "spreading" petunias). Once the plants have begun to spread, it will be much easier to water this solution into the soil than to side dress with dry fertilizer.
Incorporate timed-release fertilizer into the soil when planting window boxes or other containers. Otherwise fertilize regularly every two weeks with a liquid fertilizer meant especially for flowering plants. ("Spreading" types require weekly fertilizing.)
For a fertilizer recommendation tailor-made to your specific garden conditions, have an accurate soil test run. Contact your local County Extension office or the Soil Testing Lab at the University of Minnesota for information.
Petunias tolerate lots of heat and are relatively undemanding when it comes to water. Except for "spreading" types, which require frequent watering, thorough watering once a week should be sufficient in all but the worst weather. Leave sprinklers on long enough to soak the soil to a depth of six to eight inches every time you water. Hanging baskets and other containers also need more frequent watering, perhaps as often as daily, depending on their size and the volume of soil they contain.


Plant Uses:
Window boxes, containers, tubs, hanging baskets and pot plants.
Origin:
The species was first sent from South America to Paris in 1823. It was discovered in South America by the explorer James Tweedie, (after whom the genus Tweedie is named), who sent specimens to the Glasgow Botanical Garden in 1831. Most of the varieties seen in gardens are hybrids (Petunia x hybrid), they were among the first ornamentals to be bred for the bedding plant market in the 1950s.

How to grow and care thyme herbal plants


Thyme (Thymus vulgaris) is a small perennial shrub with lots of branches and light purple to pink flowers. It's aromatic and has a pleasant, pungent, clover flavour. There are over fifty varieties used in cooking and gardening. English thyme is used most often in cooking. Growing thyme provides an anchor in a herb garden in areas where it is evergreen in winter. Thyme is also perfect for containers, either alone or in combination with plants that won’t shade it out. The flowers open in spring and summer, sprinkling the plant with tiny, two-lipped blossoms attractive to bees.

SPECIFICATION OF THYME


Common Name -Thyme
Planting Depth-1/4 inch
Seed Spacing -1 inch
Row Spacing -18 inches
Space After Thinning -8-12 inches
Days to Germination -14-28
Days to Harvest -85
Ways to Grow -Containers, Ornamental Edibles, Small Gardens


Planting:

1. For a head start, plant the seeds or young plants 6 to 10 weeks before the last spring frost after the last frost. Plant in well-drained soil with a pH of about 7.0 with slightly alkaline conditions with 9 inches apart. For best growth, the soil should be about 70ºF.

2. Add lime to the pot or ground to raise the pH if needed. Also, add a slow-release fertilizer to the soil at or before planting and again each spring.

3. Mulching with limestone gravel or builder’s sand improves drainage and prevents root rot.

4. Pinching the tips of the stems keeps plants bushy, but stop clipping about a month before the first frost of fall to make sure that new growth is not too tender going into the cool weather.

 GERMINATION

 Use a flat tray container about 10 inches by 15 inches (biggest or smaller your choice) 1.5 to 2 inches deep. Make sure you have plenty of holes in it for good water drainage è put the seedling mix you prepared up to almost top leaving about 0.5 inches space è now evenly spread the seeds over it after that cover the seeds with seedling mix only about 0.5 cm (half a centimeter) è water it by watering can è place the container in semi-shaded place.  


As prepare a planting mix with the sand, soil and vermicompost =>Sprinkle diluted fungicide water (2gm in 1-litre water) after sowing the seeds. Make a hole in the potting mix with your finger=>Insert each seed in a hole as 1/3=>Place the planted pots or flats in a warm, above 60ºF (15.5ºC), sunny place=>too wet is quite dangerous for the seeds to keep the potting soil moist but not too wet until the seeds emerge, which should be in about 21 days=>cover the mixture with poly bag=> after 21 days  you can remove the plastic.

  Care:

Water normally and remember to trim the plants. Prune the plants back in the spring and summer to contain the growth. You can take some cuttings and plant them indoors in pots, too. If you have cold winters, remember to lightly mulch around the plants after the ground freezes.


Growing Dill


"Anethum graveolens" (Dill) was named 2010 herb of the year by the International Herb Association and lends a wonderful flavour to many foods. It is one of the few herbs that is a bit challenging to sustain, as it requires flower removal and repeated sowing. Luckily the herb grows quickly and steadily but that makes it no less desirable in any herb garden.

Types Of Dill:

Mammoth dill: A popular tall variety, produces great leaves and seeds

Monia dill: A “new and improved” dwarf variety like the better-known Fernleaf dill that can be grown in smaller spaces, including in containers

Dukat dill: An excellent "all-around variety” for gardeners with space to spare to let it grow to a good size


When To Grow:

Sow the seeds directly into the ground two to three weeks before the last usual frost date or in early May to avoid any weather surprises. Dill is heat-sensitive and will bolt when summer temperatures soar, but it can be sown again in September.

Where To Grow:

Plant your dill in well-drained, loamy, sandy soils or clay soils as well. You may grow dill in an outdoor pot at least 12 inches deep so its taproot can be accommodated. While dill can be planted in rows, consider planting dill in a “clump” where it can be allowed to self-seed for successive crops. 
Dill thrives in full sun. If it does not receive enough light, it will get leggy. Since most varieties are bushy and tall, place dill along with the sunny north side of your garden so that it doesn’t shade shorter sun-loving herbs or vegetables.

Dill is heat-sensitive and bolts quickly. It is inevitable that it will not have a long life.


How To Grow:

1. Adequately amend the soil with composted organic material or build a bed for planting.

2. Directly sow seeds 1/4-inch deep providing light to germinate.

3. Now plant in rows about two feet apart or prepare a square foot or larger area, broadcast the seeds, and rake the seeds into the soil at the recommended depth.

4. Provide regular water until the plants are well established allowing the soil to dry between irrigation. DO NOT OVER-WATER

5. Thin seedlings when they are 2 to 4 inches tall, leaving the strongest plants preventing the plants from crowding each other. "Good air circulation around the base promotes healthy plants"

6. It can be used as soon as the needle-like foliage appears.

R- Grow Herbs In Pots


A collection of herbs in containers in a sunny place near the house is a great asset for both garden and kitchen. The downside is that many pot-grown herbs die out in winter. However, they can be harvested in autumn and stored for use throughout the winter season.

Most herbs are suitable for container cultivation. They can easily be sown from seed or bought from nurseries or garden centres. Beware of the pot-grown herbs offered in supermarkets, as they are usually grown under glass and are often too lush and stressed to adapt well to life outdoors.


PLANTING HERBS

Container: Containers must have drainage holes and be large enough to accommodate the roots as they grow.

Light: Most herbs need full sun at least 6 hours a day. But where the temperature is soaring, herb containers may need to be shaded during the hottest part of the day.

Soil: Use high-quality potting soil because most herbs need good drainage. Also, make sure that your container has drainage holes. For better results prepare your own potting soil with:-
  • 1 part coconut coir or peat moss
  • 1 part compost
  • 1 part perlite
  • 1 part topsoil

Fertilizer: Be careful not to over-fertilize herbs. Most don’t like it and some herbs will flat out croak if they are fussed with and overfed. Some herbs, like thyme and oregano, thrive on neglect and won’t be as tasty if they are given too much attention, water or food.


SUGGESTED HERBS
All herbs will grow in containers.

Combine herbs according to their shape so there is room for more than one in a pot. For example, pair upright rosemary with creeping thyme. If the pot is large enough, you can add sage or chives, too.

For compact herbs, including mint, oregano, thyme, sage, and rosemary.

In humid climates, use pea gravel mulch in the pot to help keep leaves from rotting.

Difference between Annual, Perennial, Biennial


Annuals:

Plants that perform their entire life cycle from seed to flower and to seed within a single growing season. All the roots, stems and leaves of the plant die in annually. End of the cycle after annual plants produce mature seeds, they die, having exhausted themselves from sprouting, growing foliage and flowers, and finally producing viable seed in just one growing season. The mother plant dies, the plant may have left hundreds to thousands, of seeds to carry on her legacy. For annual plants, one generation per year is the norm, so they have a life cycle of one growing season. For e.g Dianthus, poppy, zinnia, cosmos, are annual .


Biennials: 

Biennials are a unique group of plants that only produce leaves the first year and then flower, go to seed and die the second. Generally, the seed is started between May and June and plants are set out in late August to early September.Biennial plants complete their life cycle over two growing seasons. The first season they grow only foliage, commonly a low-growing rosette of leaves. The second growing season they form flowers and produce seeds; then, the mother plant dies. Common biennial flowers include foxgloves and Canterbury bells. But did you know that cabbage, kale, Brussels sprouts, carrots, and celery are also biennials? We usually harvest them in their first season of vegetative growth, so we never actually see the flowers.


Perennials: 

Perennials, on the other hand, live for three or more growing seasons. They can be planted from bulb or seed – often bulbs must be planted in the fall to produce spring-blooming plants.You can purchase young plants at a nursery to plant in the spring. Perennials generally have shorter blooming periods than annuals, so gardeners often pair them with perennials that bloom at other times to maintain constant colour from spring to autumn.

First season growth results in a small rosette of leaves near the soil surface. During the second season's growth stem elongation, flowering and seed formation occur followed by the entire plant's death.It grows from seeds and bulb, Perennial plants continue to grow and flower for more than two years—and many will live for decades.

As with annuals and biennials, perennials produce flowers that, if successfully pollinated, form seeds. The difference is that the mother plant doesn’t die after producing seed. If we define a life cycle as the time it takes a plant to go from seed to seed, you can see that perennials’ life cycles can vary widely. For many common perennials, completing a life cycle usually takes from two to perhaps five years or more, For example, if you plant a cone-flower seed, you’ll get only foliage the first few years, with flowers and seed coming in subsequent years. If the first seed is formed the third season, then we would say the plant has a three-year life cycle, from seed to seed.

The word perennial is commonly used to describe long-lived herbaceous plants—those with green, non-woody stems. In temperate regions, most perennials die back to the ground in the winter, then sprout from the roots or crowns in the spring. Woody plants like shrubs and trees are also perennials, in that they grow for many years. However, in common usage, a distinction is made between woody and non-woody perennials. The word perennial is reserved for herbaceous, non-woody plants. Woody plants whose above ground parts persist through the winter are categorized as shrubs, trees, or woody vines.
Rose, Hibiscus


Wheat grass: How To Grow Step by Step Guide


Wheatgrass is a kind of grass used to treat many conditions. The above-ground parts, roots, and rhizome are used to make medicine, primarily used as a concentrated source of nutrients which contains vitamins, iron, calcium, magnesium and amino acids. It is basically a food prepared from the cotyledons of the common wheat plant.

Materials Required:

1. Organic wheatgrass sprouting seeds. Use organic to ensure the best quality, taste and yield of your final sprouts.
2. Organic potting soil and fertilizer to ensure optimum vitamins and minerals in the plant.
3. Plastic gardening tray with holes. Can be reused over and over again. A 21″ x 11″ x 2″ sized tray will yield about 14-18 ounces of juices (last approximately 2 weeks at 1 ounce a day).
4. Spray bottle. Essential to ensure that you do not over water.


Steps To Grow Wheatgrass:

1. Measure out a bowl of seeds enough to fill one layer of seeds on whatever the size of your tray. Rinse them in clean water, drain, then soak in a container with about 2-3 times of cool water.
2. Soak for about 8-10 hours. After 8-10 hours, drain the water, then soak them again for another 8 hours.

3. After the second set of 8-10 hours, drain the water, then soak them once more the same for another 8-10 hours. Check if it has sprouted roots of at least 1/8 of an inch to 1/4 of an inch.

4. Now line the bottom of the tray with unbleached paper towels so that the roots do not protrude at the bottom through the holes in the tray.

5. Fill the tray with pre-moistened soil, compost or potting mix to about one and a half inch of the tray depth. Ensure that your soil does not contain artificial fertilizers or chemicals.

6. Lay out the germinated seeds evenly and densely in one layer, on the damp soil in the tray, gently pressing them into the soil.

7. Place your tray under indirect sunlight but with proper ventilation. Wheatgrass does not like hot direct sunlight.

8. The young shoots need to be watered at least twice a day to keep them nice and moist. For better result, put a sheet of damp newspaper over the tray to keep them moist until they grow to about an inch high.

9. Use a spray bottle for watering, adjusting to light-medium. When the shoots are above one inch, probably about day 5, reduce watering to once a day in the morning. But always ensure that the water is just enough to keep the soil damp to the roots. Avoid over-watering.

10. When your wheatgrass grows to about 6 inches (about day 9 or 10), it is ready for harvesting. Use scissors and cut the wheatgrass just above the seeds.


Annual Sweet Pea Germination and Care


SPECIFICATION OF SWEET PEA

Common Name -Sweet Pea
Seed Life Cycle -Annuals
Light Requirements -Full Sun, Half Sun / Half Shade
Flower Color -Mixed
Mature Height -Vine: 6-10 feet
Bloom Time -Summer
Days to Germination -10-21 days
Soil Moisture-Average, Well Draining
Soil Type -Clay Soil, Sandy Soil, Loamy Soil
Zones -2 - 10


Sweetpea is an annual climbing vine, and highly scented ornamental closely related to the garden flower. Sweet peas are not an edible crop because it is scented flower. Sweet peas flower in the summer in cool climates and in the spring and fall in mild Mediterranean climates.
There are over 1,000 varieties of Sweet Pea. Smaller varieties: 12" - 18"; larger varieties: 4 to 6 feet.

Germination:-
The seeds should be planted 1" deep in the moist soil and spaced 6 inches apart. Sweet peas germinate best in a soil temperature between 55 and 68 degrees Fahrenheit. Or you can soak all the seeds in warm water over the night before planting.
Garden Tip: You can gently nicking the seed coat with the knife. It will take 10-14 days for germination commonly.But it can be fast within  2-3 days when the seeds are soaked overnight or nicked before planting.You can also start seeds indoors, to transplant later. For an indoor start, plant seeds 4-6 weeks before the last frost in your area. 

Growing Sweet Peas:
Sweet Pea plants are very easy to grow. They grow best in full sun and cool weather. They will do well in a variety of soils but prefer rich soil. Being an early, cool weather plant, they do not mind the cool or cold weather or wet soils.

Water them during dry periods, once or twice per week. Add a general purpose fertilizer once or twice a season. They require little maintenance.

For vining types, provide something for them to climb and they will rapidly ascend skyward.

Sweet Pea is also considered wildflowers. Once established, they will thrive and spread easily. If in a flower garden, they can get out of hand easily and overcrowd other flowers.


Tip: To keep the flowers blooming, pick spent blooms before the seed begins to form.


Take Care Of Your Bulb


Flowering Bulbs are an easy way to add splashes of tropical colour to your garden.Plant them as a border, in containers or cut a few for creating a gorgeous bouquet. These bulbs prefer a sunny, sheltered spot and should be protected from frost in winter, either by mulching or lifting and storing. With spring, summer, or fall bloom times, these effortless bulbs are sure to keep your garden and containers brimming with brilliant colours and intoxicating fragrances month after month, and year after year!


Steps to take care and maintain the bulbs:-

1. Water the Bulbs after planting to let the plant develop roots and to set the soil.

2. Water every week after the plant starts flowering if the rainfall is not adequate enough in your area. But do not over water.

3. Remove Foliage from the bloom when it has dried up (when it turns yellow) or it has died and withered.

4. Provide Support To The Bulbs that have weak stems and cannot support themselves taking care not to damage the bulb.

5. Cover the flowerbed with a layer of Mulch that helps to retain the moisture of the bed and cools the plants if there is too much heat.

6. Uproot a bulb and store it away to protect it from frost and replant it when the weather is adequate.

7. Check time to time to see if there are any bugs or diseases. There is a high chance that beetle larvae might exist in the soil because of the huge roots.In that case, apply some kind of pesticide and fungicide.

Mango Pests And Diseases and treatment


Buy our mango plants

Mango anthracnose diseases, such as flowers go black fungus can cause a fall. It may go up in the trunk of the fruit and causes the leaves of small black and brown.

The kinds of which, and in the dew of heaven more susceptible to worse. This is the worst, in areas of rain during the flowering and the fruit set. Anthracnose dry winters in the country can often be seen once the fruit ripens. It begins in the dark and goes lazy.


Unless a nasty spray, for example, copper fungicides solution or just want to be able to receive live and some anthracnose. Incessantly tree with strong cell walls shows fewer infections than a weak one. So keep pushing this compost and spray the weed.

There are many newer mango varieties that show good resistance to anthracnose. To live in heaven with one of the winter seasons!


Mango over all the other pests and diseases, so that the fruits of the drills and spotting bugs and I would have encouraged a diverse permaculture. Otherwise, they should be kept at the bottom of a garden, into the saving of the living creatures to neutralize.

Hanging from the wood upon starvation, the meaning of the shores of your Mango. The other is the subconscious of the earth. If anything it is a silent, hidden being stung.

Growing Mango Trees , Feeding and caring


Buy it now (Mango plants)

Growing Mango Trees From Seed


It is quite easy for growing mangoes from seed is actually. (After removing the slash we have stored the seeds of the mangoes, dry and freeze are thrown out in the garden as mulch, and they all grow...)


Seed selection is the most important step. If you take from any old shop seed it may not grow true to type. You should need to collect "polyembryonic" variety.


That means is that the seed will sprout several identical trees. And those seedling trees will be identical to the parent tree. They are clones.


Ideally can know the parent tree, it's from your nearest area, grows really well and gets a bumper crop every year! If not, oh well. Get seed from a polyembryonic variety and at least you know that the fruit you harvest will taste the same.


The best time to grow mangoes from seed is the beginning of the wet season or rainy season.


Eat a nice mango, remove as much flesh from the seed as possible and then let it dry for a day or two.


To germinate the mango seed you placed in moist place and wait for it to sprout.


You can plant those mango seeds individually. They should take about 20 to 30 days to sprout. 

Aegle marmelos Sacred Bael Benifits and Germination


 Buy Its Seeds Now 


SPECIFICATION OF BAEL

Common Name- Angle Marmrlos Sacred Beal
Zones -3, 4, 5, 6, 7, 8, 9
Mature Height - 48-84" tall
Light Requirements - Full Sun, Half Sun / Half Shade
Estimated Mature Spread - 48" wide
Bloom Time - Harvest early summer
Planting Depth - Keep the top of the root ball even with soil surface.
Planting Time - Spring / Summer
Soil Type - Loamy Soil
Soil Moisture - Average, Well Draining
Shape: Round
Size: 0.2-0.3cm
Color: light yellow
Usage: Germination (not for oil extraction)
Age: Fresh(less than a year, good for germination)
Origin: India
Availability: Throughout the year

Category:- Fruit Seed

SEED GERMINATION TIPS
Germinating tropical seeds can be both exceedingly easy, and very tricky. Certain seeds begin to sprout inside the fruit as it ripens. Many other seeds go into a period of dormancy that must be broken for them to germinate. Considering that "tropical seeds" encompass plants growing in such varying, but often subtlety different climates, there are a number of different strategies for germinating tropical seeds in your garden.  The only constant requirement for pretty much any seed is to keep the soil temperature warm, usually about 75-85F. Always remember, tropical seeds are not the same as the tomato, vegetable and flower of seeds you might find at a local garden store. They have widely varying germination times that can range anywhere from the Ice Cream Bean (Inga edulis), which germinates while still inside the fruit, too many types of palms, which average up to 9-12 months for germination. Fortunately, the latter is the exception, not the norm. Germinating the exotics can be quite fun and extremely rewarding, but often requires a different mindset and different approach than that used for germinating the common garden annuals.


 A world apart in germination ease from some of the tropical s, most will germinate rapidly (within days to a week or two) under standard conditions. A few, such as the peppers can be trickier, so read some of our comments below. For the most part, garden annuals need minimal pre-treatment and germinate fairly well in regular soil and with moderate water. Soil temperature requirements vary, with certain seeds such as tomatoes and peppers germinating best in warmer soils and others such as lettuce, may germinate well in cooler soils.

It is best to use by mixing 2gms of fungicide in 10-litre water and spray it on the soil before sowing seeds. Or use in any plant at first time when you place in soil or report.


Malay: pokok Maja Batu (tree)
Thai: มะตูม /mutuum/ (tree: ต้นมะตูม /ton mutuum/; fruit ลูกมะตูม lug matuum)
Hindi: बेल (Sirphal)
Urdu: (Bael)بیل ,(Sirphal) سری پھل
Oriya: ବେଲ
Bengali: বেল
Kannada: ಬೇಲದ ಹಣ್ಣು
Konkani: gorakamli
Malayalam: കൂവളം
Marathi: बेल or कवीठ (Kaveeth)
Punjabi: Beel
Sanskrit : बिल्वम्, Bilva / Bilvam
Sindhi: ڪاٺ گدرو
Sinhalese: බෙලි (Beli)
Tamil: வில்வம் (Vilvam)
Telugu: మారేడు (maredu)
Chinese: Yin du gou qi
Aegle (French)
Persian: Bael tree, Bah hindi shull
Vietnamese: Bau nau
Spanish: Bela
Nepalese: Belapatra
German: Belbaum Belfruit tree, Bengalische Quitte
French: Bel indien, Cognassier du Bengal, Coing de l’Inde
Hungarian: Bengálibirs
Japanese:Berunoki
Malay:Bila, Bilak
Khmer: Bnau
Italian: Cotogno del Bengala, Cotogno d’India
Turkish: Hind ayva agh


Buy  bael Seeds Now 

Uses / Activity: Ameliorative effect, Analgesic activity, Antidiarrhoeal activity, Antigenotoxic Activity, Antioxidant and Antimicrobial , Antiproliferative, antithyroid, Anxiolytic and antidepressant, Chemomodulatory Effects, contraceptive efficacy, Detoxifying effect, Fertility, hepatoprotective, hyperlipidemic, Hypoglycemic, Immunomodulatory, Intraocular Pressure-Lowering Activity, Larvicidal and smoke repellency effect, Reversible Changes in the Antifertility, Skin Carcinogenesis, sperm motility, Urease Inhibitor.
List of 262 published scholarly articles.

BENEFITS OF BAEL

1.The vast array of health benefits that are attributed to wood apples are mainly due to their nutrients, vitamins, and organic compounds, including their tannin's, calcium, phosphorous, fibre, protein, and iron.

2.Mix the juice of ripe Bael fruit with some ghee. Include this mixture in your daily diet to prevent heart-related diseases like heart strokes and attacks. This can reduce blood glucose levels by nearly 54%.

3.Bael juice helps in cholesterol control and also reduces blood cholesterol levels. Bael juice controls triglycerides, serum and tissue lipid profiles.

4.Bael juice contains laxatives that are helpful to control the blood sugar levels. It stimulates the pancreas and helps them in enough production of insulin that controls sugar level in the blood.

IMPORTANT USE

Research has found the essential oil of the Bael tree to be effective against 21 types of bacteria. It is prescribed for a smooth bowel movement to patients suffering from constipation and other gastrointestinal problems.


Sunday 21 June 2015

Tea, Camellia Sinensis Cultivation Tips


 How to Germinate

Step 1: Soak the seeds in water for 24 hours.(If you found any floating seeds do not throw them away yet, Keep soaking them until they sink. Change water every 1-2 days. This could take up to 7 days ) Seeds still floating after 7 days are mostly not viable. You can throw them away.Place the seeds in a plastic nursery flat, in the sun, until they crack. Mist the seeds periodically during this time with water from a spray bottle.

Step 2: File / cut / crack open the shell. This may speed up germination. ( Some shell may be cracked already, it's normal )

Step 3: Sow the cracked seeds about 1/4 deep in a container with well drained soil.Pour moist vermiculite into planting pots with the eye pointing up. The eye is a lighter shaded spot on the top of the seed.

Step 4: Water the soil until it's moisten ( not wet ). Cover the container with plastic wrap. ( This will keep the seeds in a constant moist environment, It also trap a little heat. )Place the pots in a shady area and keep the vermiculite moist at all times. The camellia sinensis seeds should germinate within two months.

Step 5: Place the container in a warm place. ( around 60°F - 78°F ). Keep soil moist, do not let it dry out.

Step 6: Move the camellia sinensis seedlings into brighter light when they have their third set of leaves.

Friday 5 June 2015

Climbing Strawberry germination


The Alpine Strawberry is the most common type of strawberries grown from seed. Once you try fresh strawberries, you will see growing them at home is worth the effort.Starting strawberries from seed is an inexpensive method and bears fruit in their second year if started in early spring.

COLD GERMINATION
  1. Put seeds into 40° C water for 24 hours.
  2. Put seeds into very wet sands or coco pit then it must be able to retain the moisture and to circulate the oxygen for germination. ( Generally, it takes more than 40 days. )
  3. Move it into the soil after it sprouts.
  4. Germination temperature: 20-25℃
  5. Zone: 5-9
  6. Germination time: 40 days
  7. Growth optimum temperature: 10-25 ℃
  8. Spacing: 20 * 20cm
  9. Rose on soil does not ask for much, just with some humus soil aggregate.


Instructions


Strawberries are hardy perennials, but the plants become less robust after about three years. Start your strawberries from seed, and then propagate by cuttings and runners. Follow along with this handy How to Grow Strawberries from Seeds guide and grow some sweetness....

Timing:


Sow indoors in the winter. An earlier start may result in berries the first year. Start anytime between December and the beginning of February. After that time, they will still work, but you will not harvest berries during the first season. Transplant out at least 3 weeks after the last frost....


Starting:


Germination is the trickiest aspect of growing strawberries. Be patient, and try the tricks below.
Take your strawberry seed packet inside a sealed plastic bag or airtight container and place in your freezer for 3-4 weeks. When you remove the bag or container, do not break the seal until it (and its living contents) have reached room temperature. This may take several hours. Err on the side of caution. Opening the package too quickly may result in water condensing on the cold seeds, and this will reduce your chances of success.
Once the sealed package has “thawed” to room temperature, you’re ready to plant. Sow the seeds on the surface of pre-moistened, sterilized seed starting mix in trays or small containers. Place these on a piece of felt or other thick cloth that has its end sitting in water. The idea is to wick up water from below so that the seedling medium stays constantly and evenly damp until germination.

Keep your seeded trays under bright fluorescent lights at a constant temperature of 18-24°C (65-75°F). Germination may take anywhere from 7 days to 6 weeks. Be patient. Once germination occurs, increase ventilation around your plants to prevent damping off.


After your plant seedlings have their third true leaf, they can be transplanted into their own pots. Be sure to harden your seedlings off carefully and gradually before transplanting outside......


Growing.


Space transplants 60cm (24?) apart in rows 90-120cm (36-48?) apart. Everbearing varieties (such as ours) tend to produce fewer runners and will produce more fruit if the runners are removed. In the first year of growth, it may be preferable to encourage runners, and let them fill in the spaces between transplants with new offspring plants.....


Grow strawberries in a well-drained, sandy loam that has been generously dug with organic matter such as finished compost or well-rotted manure. Dig ¼ cup complete organic fertilizer into the soil beneath each transplant. Keep soil moist, but not soggy. A mulch of straw around plants may help prevent the soil from drying out.....


Companion Planting.... These little plants respond strongly to nearby plants. Couple them with beans, borage, garlic, lettuce, onions, peas, spinach, and thyme. Avoid Brassicas and fennel.....


GROWING DETAILS


1. After buying the strawberry seeds, purify them with SAB for 6-7 hours. Then place them in the freezer for 2 weeks. This will improve the percentage of seeds that will germinate. Freezing stimulates the natural process of the seed going through the winter months and will help jump-start the strawberry seeds when you plant them.


2. Now sift the growing media in order to eliminate the lumps of any hard material present in it. The media can be either coco peat or peat moss.


3. Prepare your seed tray. The growing media should be 1/2 inch deep. Or you can make the bed under shade. After this, thoroughly moisturize the media.


4. Sprinkle the seeds over the damp growing media and add a light dusting of peat moss or coco peat so that it covers the seeds. Lightly sprinkle water over it.


5. Keep the seeds moist by spraying water regularly for 4 consecutive days. Make sure it receives direct sunlight. Take no risks. SUNNY WEATHER IS MANDATORY.


6. The strawberry seeds take approximately 15 days to germinate. Once the strawberry plants have sprouted, wait for the 3rd true leaf to transplant into bigger containers.


7. When the 3rd leaf finally appears, transplant the plants into larger pots. If weather permits, the plants can be planted right outside. Continue to care for the plants, keeping it well drained and moist and providing slightly alkaline soil.


8. If strawberry flowers appear in its first year, pick all flowers off the plant. This will ensure the plant is established well, before producing fruit. After the strawberry plant has gone through its first winter, it will be ready to produce fruit the next summer.


Use a flat tray container about 10 inches by 15 inches (biggest or smaller your choice) 1.5 to 2 inches deep. Make sure you have plenty of holes in it for good water drainage - put the seedling mix you prepared up to almost top leaving about 0.5 inches space- now evenly spread the seeds over it after that cover the seeds with seedling mix only about 0.5 cm (half a centimeter)-water it by watering can- place the container in semi-shaded place.  


IMPORTANT WATERING USE: Use watering can for watering. By moving the water stream constantly waves the can. Do not let the water to flood area. Or use sprayer to spray the water like mist