Showing posts with label Seasonal flowers seeds. Show all posts

Sunday, 23 April 2017

English Daisy Germination & Care ( Bells Perennis)


English Daisy( Bells Perennis) is a wild flower.It is biennial in its character and it also a hardy plant.It is bloomed especially early spring to early summer.It has many colors like red, white etc.Bells is generally called English Daisy.

SPECIFICATION OF ENGLISH DAISY

Season: Biennial
Height: 12- 18 inches
Bloom Season: spring to summer
Bloom Color: mixed
Environment: Full sun
Soil Type: Loamy, well-drained, pH 6.1 - 7.8
Average Germ Time: 14 - 21 days
Depth: 1/4 inch
Moisture: Keep seeds moist until germination
Plant Spacing: 8 - 12 inches

GERMINATION GUIDE

Step 1

Use a flat seedling tray and its deep will be 5 centimeter. Make sure you have plenty of holes in it for good water drainage.

Step 2
Take equal quantity of sand, soil and vermicompost. Then  mix all the three ingredients into one container.

Step 3

As the seeds are perfect in size then you can put the seeds over it by 1/3 after that cover the seeds with seedling mix only about 1 cm (one centimeter)
If your seeds are so tiny then you can spreed water very lightly and carefully on the seed.Make sure that the water must be mixed with diluted fungicide powder(2 gm in 1 litter water). It is very important  notice to follow that the seeds will not to go very deep inside the mixture by speeding water on the seed, if it happen then the fertilization of the seeds are become difficult.

Step 4
  
Sprinkle diluted fungicide water (2gm in 1 liter water) after sowing the seeds.We have to careful about putting the seed because seeds will not to go deep inside the mixture.

Step 5
 Cover the seedling tray with tightly  plastic polythene wrap over the pot to promote soil moisture  and place it in under  light shadow area . Lift the plastic after three days  to check that the soil  moist or  not. If not, lightly moisten it with a water-filled spray bottle before replacing the plastic.

Step 6
Remove the plastic as soon as the seedlings emerge, and gradually move the pot to a brighter area over a two-week period so that at the end of that time they're acclimated to being in full sunlight.

CARE

  • The plant needs shade in the nursery.High intensity of sunlight is harmful to it.
  • When seedling will be  reached at 4 to 6 leaf soon they will  be transplanted to poly bags.
  • But do it carefully from beds with all roots immediately after transplantation.

Site and soil:

The most important requirement  is a good location with plenty of light. It needs at least five or six hours of good sunlight. It will  perform even better when located in full sun all day. With out  much  light they will produce  fewer flowers.

Spread the organic matter two to three inches thick. Then incorporate it into the soil to a depth of eight to ten inches, using a rototiller or garden fork. This helps open up heavy clay soil, which improves drainage, but can also increase the ability of light, sandy soil always hold moisture and nutrients.


Tuesday, 28 February 2017

Appple kul Plantation ,Growing ,Care, Use and its Surprising Health Benefits.


Apple kul is a hybrid fruit has become famous profitable cultivation in West Bengal.Basically, its seeds are partially big and it can be sow directly to the soil. It likes full sun, good weather and water also.

Specification of Apple kul

location and soil

Kul loves the sunny and warm exposure. It is a tropical plant but very much adaptable to temperate climates with moderate winter, when grown on the ground.

For growing apple kul in pots choose a quality potting mix or make your own substrate using equal parts compost, sand, and soil.

It is comfortable with soft soil like “Dnoash Mati” and “Poli mati”.It can also be grown in hard soil but need special care. Soil should be prepared earlier with power tiller and need “Do-chaas”.

Seed 

It is best to use by mixing 2gms of fungicide in 10-litre water and spray it on the soil before sowing seeds. Or use in any plant at first time when you place in soil or repot.


Plant: Baby plant should be collected from the nursery. They will supply each baby plant in 6 to 12-inches tub. Care should be taken during transportation because the plant is very soft.

Plantation: After that, the plant should remove carefully from the tub and be placed in a land whose soil is prepared the prior or mixed soil. Keep distance 4 feet from each other plant is good and it’s better to maintain a row. Watering to be done properly after plantation.

Nursing: Watering the field regular basis in morning or evening. Apply organic fertilizer 1-month interval for the baby plant in very little quantity.

Growing rate: If the soil is prepared properly then the plantation of the plant will grow at very good rate after one month.The plant generally grows enough within one year that it will give fruit.


Fencing: As the plant is very soft so it required fence that should be arranged for the support of the growing trees. A bird can damage your fruit in the night.

Health Benefits of Apple kul

Apple kul has following benefits

1. Apple is enriched with full of vitamins like Vitamin C, A B1, B2, B6 and calcium, phosphorus, magnesium, potassium, and iron.

2. On top of that, they contain the highest level of pectin ammo fruits an extremely valuable compound that is being more researched these days for its huge medical benefits.

3.Apple has another benefit as it helps to protect out teeth. Malic acid present in apples which helps in
cleaning the stains affecting the teeth.


Monday, 27 February 2017

Kohlrabi Germination ,Growing ,Care, Use and its Health Benefits.


Kohlrabi is a fast-growing vegetable and good tastes too. Kohlrabi is a perennial and cool seasonal vegetable.It is capable of all type of temperature but most growth will occur in winter.There are two types of Kohlrabi -one is purple and the other is white. Kohlrabi is sweeter than the other cabbage family.


SPECIFICATION OF KOHLRABI

LOCATION

Full sun and a well-draining pattern are good for kohlrabi.Kohlrabi prefers a soil within the 5.5 gm 6.8 range. Work aged compost into planting beds before sowing.

TIME

Kohlrabi takes time to grow, it requires 45 to 60 days to reach maturity. Though it is a cool weather crop but too cold is harmful to it. It should be sowed in the garden 3 to 4 weeks before the last average frost date in spring. In warm winter regions, sow kohlrabi in late summer for winter harvest. Kohlrabi can withstand an early autumn frost. In cold winter regions, sow kohlrabi in summer for early autumn harvest.


USE FUNGICIDE

It is best to use by mixing 2gms of fungicide in 10-litre water and spray it on the soil before sowing seeds. Or use in any plant at first time when you place in soil or repot.


PLANT SPACING

 Sow kohlrabi seed ½ inch deep and 1 inch apart; thin successful seedlings from 5 to 8 inches apart. Space rows 18 to 24 inches apart. Thinned seedlings can be transplanted to another part of the garden.

IMPORTANT WATERING USE: Use watering as it required.Keep soil evenly moist for quick growth. Kohlrabi that goes without water will become woody. By moving the water stream constantly waves the can. Do not let the water to flood area. Or use sprayer to spray the water like mist

HARVESTING

  Kohlrabi needs to harvest.It will ready for harvest when stems reach 2 to 3 inches in diameter.


Saturday, 25 February 2017

Pomelo -How to peal a Pomelo Germination ,Growing ,Care, Use and its Health Benefits.

How to peal a Pomelo :

Step 1
At first, we need a cutter  to cut about 1/2 an inch into the rind.
 
Step 2
Cut the top of the pomelo off until you can almost see the fruit inside.Dig your fingers underneath the slice at the top (where you cut the cap) and pull each one firmly away.

Step 3
Remove the  skin lengthwise around the pomelo by  hand . It’s quite a thick skin so you want to cut through quite deeply before.
Step 4
 Break it into wedges and serve.

Friday, 24 February 2017

Pomelo Fruit Germination ,Growing ,Care, Use and its Surprising Health Benefits.


Pomelo is a subtropical and largest fruit tree. It likes warm climate and grows especially in summer. Pomelo fruit has sweet flesh and thick rind.Though it does not like cold weather if you want to grow it in cold season then it should be placed in a pot.It can be grown from seed which may not look the same as their parent.


BENEFITS OF POMELO

Pomelo has following benefits

 1. Pomelo fights against UTI (Urinary Tract Infection). Basically UTI is an infection which is caused by bacteria. It has the job of storing and eliminating urinary. Drinking pomelo juice is very good for those women who are pregnant. Due to high Vitamin C in it, helps to increase the acidity of urine to defend infection.

 2. Pomelo juice is also helpful to reduce the risk of stroke and heart attack. It contains high levels of potassium which regulates blood pressure and reduces bad cholesterol in human body.

3. Pomelo contains high levels of potassium and magnesium which helps to muscle cramps. Adding pomelo fruit daily in diet, it will increase leg cramps. Most importantly it can interact very badly with numerous drugs.

4. The pomelo fruit is rich in bioflavonoids, an antioxidant that obstructs especially from the breast,  intestinal, colon, and pancreatic cancers. It helps to eliminate the excess estrogen from the body and preventing cancer from spreading which can protect the body from cell damage.

5.Pomelo is also full of fibre which is very helpful to those people who want lose weight. As we know most of the calories are burned due to fibre that causes losing weight.

6.Potassium found in pomelo that has been connected to bone mineral density. Eating pomelos three times in a week will strengthen bones and preventing osteoporosis.

7.Pomelo also works as an antibody. It stimulates immune cells to guard the body against bacteria that cause cold, flu, asthma and allergies.


Tuesday, 21 February 2017

Snake Gourd Seeds Germination ,Growing ,Care, Use and its Health Benefits.


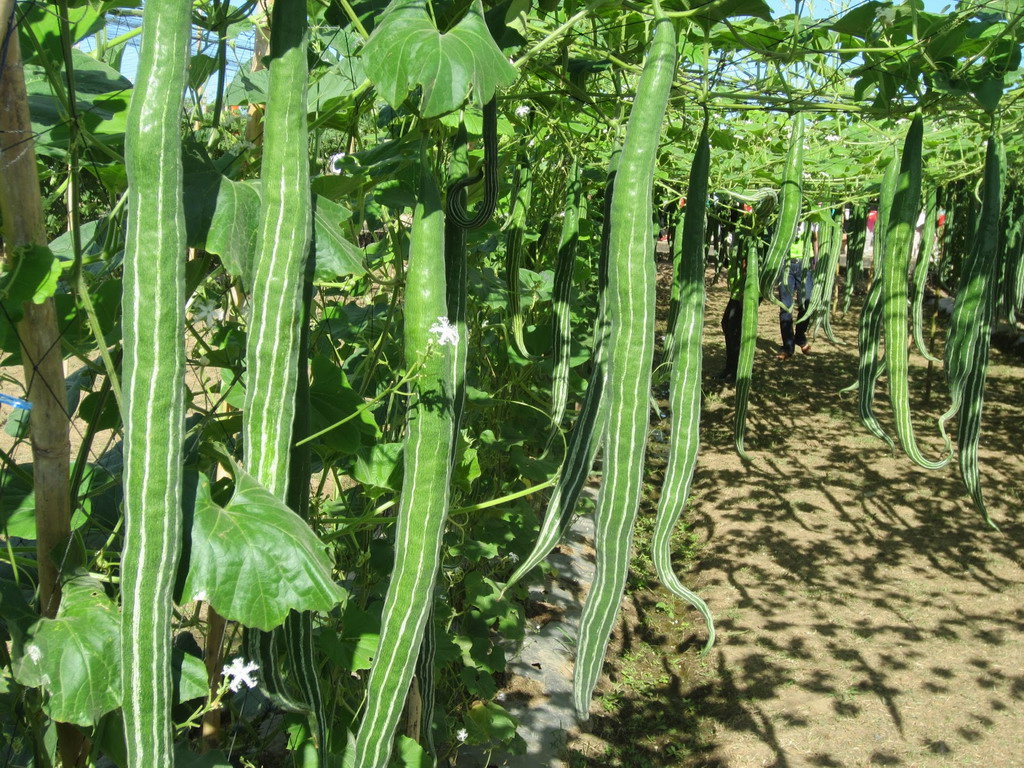
 Snake gourd belongs to a large vegetable family and of course, it is a climbing plant by nature.  It produces long and curved fruits that appear like snake hanging on the ground.It is a subtropical plant and very easy to grow fast from seed. It likes warm climate and produces lots of fruit for a long time.Snake gourd is very ethnic in India especially North and it belongs cucumber family.

SPECIFICATION OF SNAKE GOURD


Height: vining

Environment: partial shade
Soil Type: Loamy, well-drained, pH 6.1 - 7.8

Average Germ Time: 14 - 21 days

Depth: 1/4 inch

Moisture: Keep seeds moist until germination

 BIENNIAL PLANT

Biennials are sown like half-hardy annuals or perennials in spring or fall and planted out in September and October. Winter annuals such as some Californian and desert plants may be grown in summer, but are at their best sown in fall, even if grown in the greenhouse in cold winter areas.


   USE FUNGICIDE

It is best to use by mixing 2gms of fungicide in 10-litre water and spray it on the soil before sowing seeds. Or use in any plant at first time when you place in soil or repot.


 GERMINATION

 Snake gourd is very easy to grow from seed. Its seed can be shown directly to the soil.

1.Sprinkle diluted fungicide water (2gm in 1-litre water) after sowing the seeds.We have to care about putting the seed because seeds will not go deep into the mixture.


Snake Gourd seeds are notoriously slow to germinate and sprout.  Then you need to rough up the surface of each snake gourd seed in order to speed up their germination and growth. Then you need to soak the selected the seeds in water for full 24 hours before planting them. Select a place which receives six or more hours of direct sunlight to plant the seeds. The soil should be well-drained and well worked and enough rich soil.

This plant need strong support to prevent their fruits from touching the ground. Therefore it is recommended to create a fence. After sowing the seeds in the soil with 3 inches of peat moss, 2 inches of compost and 1 inch of perlite. Then you need to make sure the soil is warm enough in order to support the germination process.

You need to plan sow the seeds during spring. Need to push the soil to a depth of half inch by hand.Sow the seeds  apart  12 inches between the seeds. Everything as  order  get the opportunity to yield the vegetable in 2 months’ time. To  make it  more length knot a string down word the fruits with  a little weight.Then it will  be straight and lengthy.

USES OF SNAKE GOURD

The followings are a few advantages of snake gourd -

1.The juice of the snake gourd fruit may be used to not just deal with dandruff but in addition helps to avoid the signs and symptoms of the condition.

2.The leaves of the plant are helpful just as one emetic as well as purgative in youngsters struggling with bowel problems.

3.It really is abundant with proteins, vitamins A, B and C in addition to minerals.

Koromcha or Caronda Germination ,Growing ,Care, Use and its Surprising Health Benefits.


Caronda is a perennial evergreen plant. It needs subtropical climate until available grows up.Its seed will be available in 3 weeks time.Caronda can be also termed as an ornamental plant.Its fruits are oval type.It is a bushy  or small tree, with strong, simple or forked thorns in pairs. The plant attains a height of 6-10ft. It is met with throughout India, Burma, Ceylon and Malacca, mostly on sandy or rocky soil in a wild state. Leaves are evergreen, elliptic, or oval, opposite, dark green, leathery, glossy, on the upper surface, light green on under side.It is sometimes cultivated for its fruit.


SPECIFICATION OF CARONDA


Season: Perennial

Height:1 to 2 meters
Environment: Full sun
Soil Type: Loamy, well-drained, pH 6.1 - 7.8
Average Germ Time: 14 - 21 days
Depth: 1/4 inch

Moisture: Keep seeds moist until germination

GERMINATION OF CARONDA SEED

Step 1

Use a flat seedling tray and its deep will be 5 centimetres. Make sure you have plenty of holes in it for good water drainage.

Step 2

As the seeds are perfect in size then you can put the seeds over it by 1/3 after that cover the seeds with seedling mix only about 1 cm (one centimetre).


Step 3
 Take equal quantity of sand, soil and vermicompost. Then mix all the three ingredients into one container.

Step 4
  
Sprinkle diluted fungicide water (2gm in 1-liter water) after sowing the seeds.Be careful about putting the seed because seeds will not go deep into the mixture.


 Step 5
 Thereafter spread the Caronda seeds in the mixture.Make sure that the water must be mixed with diluted fungicide powder.It is very important to notice to follow that the seeds will not to go very deep inside the mixture by speeding water on the seed, if it happen then the fertilization of the seeds are become difficult.


Step 6
Minimum  warm, above 60ºF (15.5ºC), is needed inside the container and it should be placed in sunny area.After that the whole thing should be covered with a poly bag and after 21 days later the plastic can be removed.


The plant is grown from seed sown in August and September. Vegetative propagation also is practiced in the form of budding and inarching. Cuttings may also succeed. The first monsoon shower is planting time. Plants raised from seed start bearing two years after planting. Flowering starts in February and in Eastern  India the fruit ripens from May to Jully.The unripe fruit is sour and astringent, and is used for pickles. The ripe fruit is sweet, deible and particularly suitable for tarts and puddings and jellies.

WATER: Water requirement of Karonda is very low. Irrigation after planting and manuring is essential. Plantation once established does not need much water. However, if there is no rain during the development of fruit, one irrigation may be given. This will increase the fruit size.


MORE INFORMATION

Many of these germinate readily at warm temperatures, and can be sown direct to the garden or early in the greenhouse or cold frame. If started early, they often bloom the first year. Others germinate best at cool or cold temperatures and the seedlings need cool temperatures. Many have various dormancy and need the pre-treatment indicated.


These often need very warm temperatures. Bottom heat and constant moisture are often beneficial. Some take surprisingly long times to germinate. Many people think all tropical seeds are short-lived and perishable, but many of the longest-lived seeds are tropical, and some even need to be aged dry for a year before they will germinate!


SOIL

Many seeds do well sown direct to ordinary garden soil, but even good soil may be poor in pots or flats. These need a lighter, looser soil. Most commercial mixes are fine, but the addition of some garden soil and compost will often insure adequate beneficial micro-organisms and fungi, A good soil mix can be made at home from 1/3 garden loam, 1/3 peat or compost, and 1/3 gritty sand. Number 1 limestone chick-grit makes a good top dressing for many alpines or slow germinating seed to discourage algae growth. Crushed charcoal also helps.


BENEFITS

Karonda have the following benefits-

1.It provides comfort during Diarrhea.

2.It mitigates cough.

3.Koromcha helps to stop internal bleeding.

4.It is a cardio tonic for body. Thus it regulates heart function to avoid heart diseases.


Saturday, 11 February 2017

Hibiscus Flower Germination ,Growing ,Care, Use and its Benefits.


Hibiscus is an Indian perennial flower. It is known for its large, showy flowers that come in a different range of shapes and colours.Its foliage looked like a large, glossy and yellow in color.It can be purchased or collected from the parent plants.


Sow in early spring for use as an annual
Plant in spring or autumn and grow them on in the greenhouse for their first year to plant them out in early summer of the following year.
For best germination soak seed in hot water for 48 hours before sowing. Change the water ever 12 hours with fresh hot water.
Sow in trays or pots of peaty compost, cover seeds with a sprinkling of sieved compost. Darkness will help germination. Place in a propagator or warm place, maintaining an optimum temperature of 24 to 27°C (75 to 80°F). Plants will flower in 12 weeks from sowing.


SPECIFICATION OF HIBISCUS

Bloom Color: Red,yellow,pink,white,gray
Environment: Full sun
Soil Type: Loamy, well-drained, pH 6.1 - 7.8
Temperature of 24 to 27°C (75 to 80°F)

Average Germ Time: 15 -30 days
Depth: 1/4 inch
Moisture: Keep seeds moist until germination
Sandy Soil, Loamy Soil, Clay Soil


GERMINATION GUIDE

 Hibiscus flower seed germination is not too complicated. Here are some following steps to germinate -

1. The seeds can be sowed 6-8weeks before the last frost is predicted.

2.Make sure that the water must be mixed with diluted fungicide powder.

3.This seed needs to nicking with a knife and then soaking them overnight in warm water.

4.Thereafter the flower seeds can be sowed into a small scalding tray or pot.It must be noticed that the drain pattern of the scalding tray well so that the poured water can be easily come out.

5. Then slowly cover the tray with a plastic polythene and keep the seeds moist not soggy.

6. Keep the temperature constantly warm and the soil consistently moist will aid germination.

7. When the seeds will grow up with small leaves then the plant can be moved to larger pots or direct to the soil.

8.These tender young plants should be introduced to the sun gradually over several days. At this point, a water-soluble fertilizer can be used.

BENEFITS OF HIBISCUS FLOWER

Hibiscus is a beneficial flower plant. Its different parts are used in many different sources. The tea of Hibiscus flower helps to maintain lowering cholesterol, protects the liver, work as anti-cancer properties, weight lose and many others.


Mexican Zinnia Seeds Germination ,Growing and Care.


Mexican Zinnia is beautiful native flower plant can grow to 24 inches. It is a hardy plant grows especially in summer.It needs full sun to germinate its seed.

SPECIFICATION OF MEXICAN ZINNIA


Indoors: March to April
Start indoors four to six weeks before the last frosts.
Gradually acclimatize indoor started seedlings outdoors after all danger of frost has passed and the weather has warmed considerably. Plant out 25 to 30cm (10 to 12in) apart.


GERMINATION GUIDE

  1. Sowing Outdoors in April to July.Dig in a good amount of organic material.
  2. Create a bed on the ground with vermicompost or take seedling tray and cover the tray with vermicompost.
  3. Add compost and all-purpose fertilizer before sowing.As because seeds of zinnia flowers can be sown directly into the sunny flower bed, as developing roots do not like to be disturbed.
  4. Sow the seeds in a container that can be planted directly into the garden later.
  5. Sow seeds after the last frost, and in an area with full of sun. Sow seeds 5 to 7cm (2 to 3in) apart in rows 30cm (12in) apart. Cover seeds with light soil.
  6. Keep soil moist until seeds germinate, in 5 to 10 days.
  7. Grow in fertile, rich, and well-drained soil
  8. Germinate within 7 - 14 days.
  9. the seeds in peat pots, poo pots (pots made from cow dung) or other biodegradable containers that can be planted directly into the garden later. Start seeds four to six weeks before the last frost date in your area.
  10. Read more about Gardening Know How: Zinnia Care – How To Grow Zinnia Flowers https://www.gardeningknowhow.com/ornamental/flowers/zinnia/growing-zinnia-flowers.htm


CARE AFTER GERMINATION


  • When plants are 3 to 5cm (1 to 2in) in height, transplant to 7cm (3in) pots and grow on. Gradually acclimatize indoor started seedlings outdoors after all danger of frost has passed and the weather has warmed considerably. Plant out 25 to 30cm (10 to 12in) apart.
  • Cut above a leaf node to get more flowers.


WATERING :

Watering it daily but do not over-water the plant.


Thursday, 2 February 2017

Pomegranate seed germination and its Wonderful Heath Benefits


Pomegranate plant comes in a shrub.It has large fruits and small flowers usually one inch in diameter which is red or orange.It likes good sunlight and good drainage system. The fruits are usually harvested in September and December.
SPECIFICATION OF POMEGRANATE
USDA Zones: 3 - 10
Height: 60 - 84 inches
Bloom Season: September to December
Environment: Full sun
Soil Type: Loamy, well-drained, pH 6.1 - 7.8
Temperature: 75 - 80F
Average Germ Time: 14 - 21 days
Depth: 1/4 inch
Moisture: Keep seeds moist until germination
Plant Spacing: 10 to 12 feet apart
Sandy Soil, Loamy Soil, Clay Soil
Sow Outdoors: Surface. Following the last frost. Spacing 4 to 24 inches (10 to 60 cm).
Sow Indoors: Mix seeds in a growing medium, place in a freezer bag, keep moist, then stratify by refrigeration for two to three weeks. Use peat pots. Germination time: one to three weeks in the light. Temperature 75°F (24°C). Seven or eight weeks in advance. Transplant outdoors in the last month of spring.
GERMINATION GUIDE
Step 1
Use a flat seedling tray and its deep will be 5 centimetres. Make sure you have plenty of holes in it for good water drainage.
Step 2
As the seeds are perfect in size then you can put the seeds over it by 1/3 after that cover the seeds with seedling mix only about 1 cm (one centimetre)
Step 3
Take equal quantity of sand, soil and vermicompost. Then mix all the three ingredients into one container.
Step 4

Sprinkle diluted fungicide water (2gm in 1-litre water) after sowing the seeds.
Step 5
Thereafter spread the Pomegranate seeds on the mixture. Make sure that the water must be mixed with diluted fungicide powder.It is very important to notice to follow that the seeds will not to go very deep inside the mixture by speeding water on the seed if it happens then the fertilization of the seeds are becoming difficult.
Step 6
Cover the seedling pot   tightly plastic polythene wrap over the pot to promote soil moisture retention and place it in a dimly light area of the house. Lift the plastic after 2  days to check that the soil is moist or not. If not, lightly moisten it with a water-filled spray bottle before replacing the plastic. Expect germination within three to five days.
Step 7
Remove the plastic as soon as the seedlings emerge, and gradually move the pot to a brighter area over a two-week period so that at the end of that time they're acclimated to being in full sunlight.
FERTILIZING
Pomegranates are fast growers and heavy feeders and benefit from regular applications of fertilizer. Mature trees may require as much as 1/2 pound actual nitrogen per year. Apply fertilizer monthly, just prior to heavy pruning.
IMPORTANT WATERING USE: Use watering can for watering. By moving the water stream constantly waves the can. Do not let the water to flood area. Or use the sprayer to spray the water like mist.

Heath Benefits of Pomegranate


It is one of the healthiest fruits in the  world . It has many incredible health benefits . It  has rich anti-oxidant, anti-viral and anti-tumor properties and is said to be a good source of vitamins.Especially with  vitamin A, vitamin C, and vitamin E, also with folic acid.
1. Protects us from free radicals work for Anti Ageing

Pomegranate is rich in anti-oxidants and  protects our body from free radicals, which are responsible for premature ageing.
2. It thins your blood
Antioxidants present in pomegranate act as a 'thinner for your blood'. The seeds of pomegranate prevent your blood platelets from forming clots and coagulating.
There are two types of blood clots, first is the good one which speeds the recovery during a cut or an injury and second is when there is any internal clot, like in heart, arteries or anywhere else inside the body. These type of clots are not good and can be fatal.

3.
It acts like an oxygen mask

The anti-oxidant property of pomegranate prevents bad cholesterol from oxidizing. Due to anti-oxidants present in pomegranate, it fights to free radicals and  reduces cholesterol and also prevents the blood clot.Pomegranate helps to pump the level of oxygen in our blood. So, eating regular pomegranates removes the excess fat and prevents the Heart Attack.

4. It prevents arthritis

Pomegranate can reduce the damage of the cartilage by fighting the enzyme that does so. Pomegranate also has the ability to reduce inflammation.
5. Boosts immunity
Pomegranates are extremely healthy for those suffering from immune-related disorders like rheumatoid arthritis and osteroarthrits. And also rich in vitamin C, which boosts antibody production and helps in the development of immunity. Pomegranates can  help to maintain a healthy immune system .
6. Fights heart disease and prostate cancer

Two studies claim that pomegranate juice has the ability to fight prostate cancer. Pomegranate juice  prevents cardiovascular diseases.
7. Rich  nutrients with  pomegranate
A cup of pomegranate seed contains 24 grams of sugar and 144 calories.
A cup of pomegranate seeds contain following nutrients:
Fiber: 7 grams
Protein: 3 grams
Folate: 16 %
Potassium: 12 %
Vitamin C: 30 %
Vitamin K: 36 %
8. It improves memory

People who had a problem with their memory were given 237ml of pomegranate juice every day. After a certain period of time, a lot of improvement was seen in their verbal and visual memory.  Pomegranate consumption can also prevent Alzheimer's.

9. It keeps lowers blood pressure
It  help to lower cholesterol, triglycerides and reduce blood pressure.
 
10. Helps in digestion

As pomegranate with rich fiber is good for digestion. One pomegranate contains 45 per cent of our daily recommended intake of fiber.

Nigella plant Germination ,Growing ,Care, and Uses.


Nigella is a colourful annual flower. It has many different colours like 
 pale blue, white, pink etc.

SPECIFICATION OF NIGELLA


Difficulty Easy
Exposure: Full sun
Season: Half hardy annual.
USDA Zones: 3 - 10
Height: 8 to 20 inches (20 to 50 cm).
Bloom Season: Summer through fall
Environment: Full sun
Soil Type: Loamy, well-drained, pH 6.1 - 7.8
Average Germ Time: 14 - 21 days
Sowing Temperature: 20--25C
Growing Temperature: 18--35C
Grow up / Flower days : 80days
Spacing:15×15cm
Colour of Flower: Light blue
Depth: 1/4 inch
Moisture: Keep seeds moist until germination
Plant Spacing: 20-30cm (8-12″).
Soil: Fertile, well-drained soil.
Optimal soil temperature for germination: 18-21°C (65-70°F). Seeds should sprout in 8-15 days.


 GERMINATION GUIDE :

Step 1

Use a flat seedling tray and its deep will be 10 centimetres, and fill seedling mediator within 3/4  of the rim with a sterile potting soil or sieved vermicompost. Fill the tray with diluted fungicide water (2gm in 1-litre water). Make sure you have plenty of holes in it for good water drainage. And  Allow the soil in the flat to absorb the water through the bottom drainage holes until the soil surface becomes moist.

 Step 2

Sow the seeds in prepared beds and gently press them into the surface. Keep moist until the seeds germinate. Because of their lacy foliage, nigella seedlings are easy to recognize among weeds. Nigella usually grows better from direct-sown seeds than from transplanted seedlings.Keep the distance 11" with the other plants.Try to sow seeds two or three times from late spring to early summer, because they stay  only few weeks. Flower colours include white, blue, pink and purple.

Step 3
Moist again with diluted fungicide water ensure the soil surface it's evenly moist. Cover tightly plastic polythene wrap over the pot to promote soil moisture retention and place it in a 60 to 70 degree Fahrenheit location or in an artificial area of the house that receives indirect light to germinate if it planted in a seedling pot. Lift the plastic after two days  to check that the soil is moist or not. If not, lightly moisten it with a water-filled spray bottle before replacing the plastic.


Step 4
 
The Nigella usually sprout within14 to 21 days.Remove the plastic as soon as the seedlings emerge, and gradually move the pot to a brighter area with six to eight hours of daily sunlight for a two-week period so that at the end of that time they're acclimated to being in full sunlight. Water the seedlings when the soil surface feels dry.

 Step 5

Transplant the Nigella outdoors or in a new pot when they are about 4 weeks old and about 4 to 6 inches tall. Plant at them 6 to 8 inches apart on the ready ground with same depth were they growing at previously.


GERMINATION CARE
After the seedlings germinate, they can relocate to a sunny south- or west-facing window. The soil is kept moist at all times, but not allowed to get soggy. Once the seedlings have three true leaves, they are fed every two weeks with a liquid houseplant fertilizer. Pinching out the growth tips isn't necessary.


IMPORTANT WATERING USE: Use watering can for watering. By moving the water stream constantly waves the can. Do not let the water to flood area. Or use sprayer to spray the water like mist


Monday, 23 January 2017

Snapdragon Flower Germination ,Growing ,Care, Use and its Benefits.


Snapdragon plants are perennial native plant and it has sweet fragrant. Snapdragon can be started from seed.It can be placed before the last frost of the year.It is an annual plant.
Snapdragon plants are easy to grow. Most varieties are early summer bloomers. Grows 1 1/2' to 3' tall. Snapdragons are excellent in beds, edgings, and containers. They are popular cut flowers for bouquets and vases. Snapdragons attract hummingbirds.


SPECIFICATION OF SNAPDRAGON (Antirrhinum Majus) FLOWER

Sunlight: Full sun
Maturity: 80-100 days from seed to flower
Height: 12 to 36 inches
Spacing: 6 to 18 inches apart in all directions
Season: Annual
USDA Zones: 3 - 10
Bloom Season: winter
Bloom Color: Mix
Environment: Full sun
Soil Type: Loamy, well-drained, pH 6.1 - 7.8
Temperature: 75 - 80F
Average Germ Time: 14 - 21 days
Depth: 1/4 inch

Moisture: Keep seeds moist until germination
Plant Spacing: 4 inches

GROWING OF SNAPDRAGON


1.Snapdragon likes full sun. The draining system should be well and it will grow well in average soil.

2.If the soil is poor then fertilize the seeds before planting.

3.Snapdragon flowers are bloomed in June and after the death of the flower cut the plant. The rest of the plant can also be grown by adding some general purpose fertilizer.

4. It is a hardy plant and it can be boomed in heavy frost.


GERMINATION GUIDE

Use a flat seedling tray and its deep will be 10 centimetres, and fill seedling mediator within 3/4  of the rim with a sterile potting soil or sieved vermicompost. Fill the tray with diluted fungicide water (2gm in 1 litre water). Make sure you have plenty of holes in it for good water drainage. And  Allow the soil in the flat to absorb the water through the bottom drainage holes until the soil surface becomes moist.

Sow seeds on the soil surface apart 2 in. Press on the seeds lightly with your fingers so they are in full contact with the soil, but don't cover them with soil because they require light to germinate.We have to care about putting the seed because seeds will not go deep into the mixture.  and set the flat inside.

Moist again with diluted fungicide water ensure the soil surface it's evenly moist. Cover tightly plastic polythene wrap over the pot to promote soil moisture retention and place it in a 60 to 70 degree Fahrenheit location or in an artificial area of the house that receives indirect light to germinate. Lift the plastic after two days to check that the soil is moist or not. If not, lightly moisten it with a water-filled spray bottle before replacing the plastic.

 The snapdragons usually sprout within seven to 10 days.Remove the plastic as soon as the seedlings emerge, and gradually move the pot to a brighter area with six to eight hours of daily sunlight for two-week period so that at the end of that time they're acclimated to being in full sunlight. Water the seedlings when the soil surface feels dry.


Transplant the snapdragons outdoors or in a new pot when they are about 8 weeks old and about 4 to 6 inches tall. Plant at them 8 to 14 inches apart on the ready ground with same depth were they growing at previously.

Thursday, 12 January 2017

Lobularia flower seed germination


Lobularia is a hardy annual plant.It has sweet fragrant. It is bloomed especially in early spring and cool season is appropriate for its growth.

SPECIFICATION OF LOBULARIA

mature height : under 6 in. (15 cm)
bloom time: spring to summer
zone : 3 to 9
flower colour: white and pink
soil type : Sandy Soil, Loamy Soil, Clay Soil
light :full sun
Spacing:3-6 in. (7-15 cm)

GERMINATION GUIDE
Most important: Avoid Rainy day or a cloudy weather for sowing the seeds.
You will definitely get nothing unless you wait for the bright sunny day and clear weather.


Use a flat seedling tray and its deep will be 10 centimetres, and fill seedling mediator within 3/4  of the rim with a sterile potting soil or sieved vermicompost. Fill the tray with diluted fungicide water (2gm in 1 litre water). Make sure you have plenty of holes in it for good water drainage. And  Allow the soil in the flat to absorb the water through the bottom drainage holes until the soil surface becomes moist.

 Sow the seeds on the soil surface, spacing the seeds 4 inches apart in staggered rows set 10 inches apart. Leave the seeds uncovered because alyssum requires light to germinate. Press on the seeds lightly with your fingers so they are in full contact with the soil, but don't cover them with soil because they require light to germinate.We have to care about putting the seed because seeds will not go deep into the mixture.  and set the flat inside.

If it plants in outdoor then moist the bed with a fine spray of water daily so the soil surface remains moist. The seeds won't germinate if the soil surface dries completely.
Moist again with diluted fungicide water ensure the soil surface it's evenly moist. Cover tightly plastic polythene wrap over the pot to promote soil moisture retention and place it in a 60 to 70 degree Fahrenheit location or in an artificial area of the house that receives indirect light to germinate. Lift the plastic after two days  to check that the soil is moist or not. If not, lightly moisten it with a water-filled spray bottle before replacing the plastic.

 The Lobularia usually sprout within seven to 10 days.Remove the plastic as soon as the seedlings emerge, and gradually move the pot to a brighter area with six to eight hours of daily sunlight for  a two-week period so that at the end of that time they're acclimated to being in full sunlight. Water the seedlings when the soil surface feels dry.

Transplant the Lobularia from seedling tray outdoors or in a new pot when they are about 8 weeks old and about 4 to 6 inches tall. Plant at them 8 to 14 inches apart on the ready ground with same depth were they growing at previously.


Care: 
Lobularia is relatively low maintenance. Trim the tops removing half the growth. This will not only help to keep them compact but will also encourage further flowering. The second set of seedlings may be planted at the end of the summer for flowers to continue blooming throughout the year.

Pests:
Lobularia is generally pest resistant. Aphids can attack, especially when the plants are under stress. However, regular use of Neem Oil prevents pests from attacking the plant.


Tuesday, 22 November 2016

Begonia flower seed germination


It is difficult to grow Begonias from seed, but the seeds themselves are quite easy to retrieve from plants at the end of the flowering period. These annual plants can flower throughout summer but produce seeds in small seed pods toward the end of the growing season. Annuals do not return from their roots in the following growing season, so you must retrieve the seeds in fall and store them until spring. The many different begonia species can be used for borders, container gardens or grown indoors as houseplants.


FLOWER SPECIFICATION

Light Requirement for Begonias: Bright Light to Filtered Light

Water Requirement for Begonia: Drench, Let Dry

Humidity for Begonias: Average Home

Fertilizer for Begonias: High Phosphorus

Potting Mix for Begonias: All-Purpose

Propagation of Begonias: Division, Leaf Cuttings, Seed, Stem Cuttings

Decorative Use for Begonias: Hanging Basket, Table

Temperature: 2 to 75°F (22 to 24°C). Keep temperature as

Height: 0.5 to 1.5 feet

Flower colour: Red, white, pink

Germination Time: At 7-10 days the radical emerges and the flats should be removed from the 100% humidity environment. After 2 weeks, germination should be complete.


Fertilizer: Feed with huge water, to keep the moisture (if required). Use vermicompost and also use the mixture of water and rotten mastered oil cake - 20:1 weekly to feed.

Growing From Seed - we need to Wax begonia seed for sown indoors four to six months before the last spring frost date. Sow the very fine, almost powder-like seeds in a sterile growing mix and water the plants from below to avoid problems with damping-off, a fungal disease. Press the seeds into the soil but do not cover them with soil; they require light to germinate. Cover the seed flat with glass or plastic to maintain high humidity.We have to take 14 to 20 days for germination. Soil temperatures must have between 70° and 75°F are ideal.

Step 1

Use a flat seedling tray and its deep will be 5 centimetres. Make sure you have plenty of holes in it for good water drainage.


Step 2

As the seeds are perfect in size then you can put the seeds over it by 1/3 after that cover the seeds with seedling mix only about 1 cm (one centimetre)

Step 3

Take equal quantity of sand, soil and vermicompost. Then mix all the three ingredients into one container.


Step 4

Sprinkle diluted fungicide water (2gm in 1-litre water) after sowing the seeds.We have to care about putting the seed because seeds will not go deep into the mixture.


Step 5

Thereafter spread the Begonia seeds in the mixture. If your seeds are so tiny then you can spread water very lightly and carefully on the seed.Make sure that the water must be mixed with diluted fungicide powder. It is very important to follow that the seeds will not to go very deep inside the mixture by speeding water on the seed if it happens then the fertilization of the seeds have become difficult.


Step 6


Cover tightly plastic polythene wrap over the pot to promote soil moisture retention and place it in a dimly lit area of the house. Lift the plastic daily to check that the soil is moist. If not, lightly moisten it with a water-filled spray bottle before replacing the plastic. Expect germination within three to five days.


Step 7

Remove the plastic as soon as the seedlings emerge, and gradually move the pot to a brighter area over a two-week period so that at the end of the time they're acclimated to being in full sunlight.


Step 8

Minimum warm, above 60ºF (15.5ºC), is needed inside the container and it should be placed in the sunny area.After that, the whole thing should be covered with a poly bag and after 21 days, the plastic can be removed.


Step 9

Watering it as it is required. Place the container in a semi shaded place. Begonia needs a proper sunny area to germinate.


Water the plant. Most of the plants are needed a bit of extra watering after first being planted, in order to avoid what is known as ‘transplant shock’. Give your begonias a heavy watering, so that the soil is moist but not drenched. The flowers will need to be watered every few days from there on, either manually or with a sprinkler system. Begonias don’t tolerate heavy watering well, so don’t worry about keeping their pot constantly wet. In fact, if it rains heavily in your area, you may have to move your begonias onto a porch or indoors to prevent them from drowning.


Wednesday, 16 November 2016

Aster germination tips


Start Aster seeds indoors 6 - 8 weeks before the end of frost, or for areas with long growing seasons, the Aster Milady seeds can be started directly outdoors in a prepared seedbed. This dwarf Aster is very heat resistant and virtually worry-free. It will produce non-stop blooms from summer until the first hard frost in fall. Deadheading helps to keep the plant tidy and promotes continuous blooming.


SPECIFICATION OF DIANTHUS

Season: Annual
USDA Zones: 3 - 9
Height: 10 inches
Bloom Season: Early summer to fall
Bloom Color: Mix
Environment: Full sun to partial shade
Soil Type: Well-drained, rich, deep, light soil, pH 6.0 - 6.5
Light Requirements -Full Sun, Half Sun / Half Shade
Seed Life Cycle-Perennials

GERMINATION GUIDE
Step 1
  Use a flat seedling tray and its deep will be 5 centimetres. Make sure you have plenty of holes in it for good water drainage.

Step 2
 As the seeds are  perfect in size then you can put the seeds over it by 1/3 after that cover the seeds with seedling mix only about 1 cm (one centimetre)


Step 3
 Take equal quantity of sand, soil and vermicompost. Then mix all the three ingredients into one container.

Step 4
  Sprinkle diluted fungicide water (2gm in 1-litre water) after sowing the seeds.We have to care about putting the seed because seeds will not go deep into the mixture.


 Step 5
 Thereafter spread the Aster seeds in the mixture. If your seeds are so tiny then you can spend water very lightly and carefully on the seed.Make sure that the water must be mixed with diluted fungicide powder.It is very important to notice to follow that the seeds will not to go very deep inside the mixture by speeding water on the seed if it happens then the fertilization of the seeds become difficult.


Step 6
 Cover tightly plastic polythene wrap over the pot to promote soil moisture retention and place it in a dimly lit area of the house. Lift the plastic daily to check that the soil is moist. If not, lightly moisten it with a water-filled spray bottle before replacing the plastic. Expect germination within three to five days.

Step 7
Remove the plastic as soon as the seedlings emerge, and gradually move the pot to a brighter area over a two-week period so that at the end of that time they're acclimated to being in full sunlight.

Step 8
Minimum warm, above 60ºF (15.5ºC), is needed inside the container and it should be placed in the sunny area.After that, the whole thing should be covered with a poly bag and after 21 days later the plastic can be removed.

Step 9

 watering can as it is required. place the container in a semi shaded place.  Aster needs a proper sunny area to germinate it.

WARNING

1. Do not sow seeds on Rainy day or in a cloudy weather
2. You will definitely end up with nothing, wait for the bright sunny day and clear weather
3. Please check the forecast before sowing the seeds on the following website :


Tuesday, 15 November 2016

Dianthus germination tips


FLOWER SPECIFICATION 

Season: Perennial
USDA Zones: 4 - 9
Height: 8-10 inches
Bloom Season: Late spring through summer
Bloom Color: Pink
Environment: Full sun to partial shade
Soil Type: Well-drained, pH 6.8 - 7.5
                 
Dianthus is a genus of plants, members of the plant family Caryophyllaceae. Commonly known as carnations, pinks or Sweet Williams, the flowering plants are annuals, biennials or short-lived perennials.

Dianthus flowers have fragrant blooms, that are 1" to 1 1/2" diameter. Most varieties of  Dianthus will grow 18" to 24". They look great in a flower bed, or a rock garden. They can be planted singly or in groups.Dianthus are grown from seed. They can also be propagated by cuttings.

Dianthus seeds can be directly seeded into your flower garden or started indoors for transplanting later. Dianthus prefers warm weather. If planting outdoors, sow them after the soil has begun to warm in the spring.

GERMINATION TIPS

Step 1
  Use a flat seedling tray and its deep will be 5 centimetres. Make sure you have plenty of holes in it for good water drainage.

Step 2
 As the seeds are  perfect in size then you can put the seeds over it by 1/3 after that cover the seeds with seedling mix only about 1 cm (one centimetre)


Step 3
 Take equal quantity of sand, soil and vermicompost. Then mix all the three ingredients into one container.

Step 4
  Sprinkle diluted fungicide water (2gm in 1-litre water) after sowing the seeds.We have to care about putting the seed because seeds will not go deep into the mixture.


 Step 5
 Thereafter spread theDianthus seeds on the mixture. If your seeds are so tiny then you can spread water very lightly and carefully on the seed.Make sure that the water must be mixed with diluted fungicide powder.It is very important to notice to follow that the seeds will not to go very deep inside the mixture by speeding water on the seed if it happens then the fertilization of the seeds become difficult.


Step 6
 Cover tightly plastic polythene wrap over the pot to promote soil moisture retention and place it in a dimly lit area of the house. Lift the plastic daily to check that the soil is moist. If not, lightly moisten it with a water-filled spray bottle before replacing the plastic. Expect germination within three to five days.

Step 7
Remove the plastic as soon as the seedlings emerge, and gradually move the pot to a brighter area over a two-week period so that at the end of that time they're acclimated to being in full sunlight.

Step 8
Minimum warm, above 60ºF (15.5ºC), is needed inside the container and it should be placed in the sunny area.After that, the whole thing should be covered with a poly bag and after 21 days later the plastic can be removed.

Step 9

 watering can as it is required. place the container in a semi shaded place.  Dianthus needs a proper sunny area to germinate it.


Ø Do not sow seeds on Rainy day or in a cloudy weather
Ø You will definitely end up with nothing, wait for the bright sunny day and clear weather
Ø Please check the forecast before sowing the seeds on the following website :


Sunday, 27 September 2015

A to Z Germination tips

Different Germination Tips & Articles


Mail: contct@shiatoshi.com