Showing posts with label vegetable seed. Show all posts

Monday, 23 July 2018

Pumpkin Seeds Germination ,Growing ,Care Use and its Health Benefits


 Description:

Pumpkin is a very common vegetable. It is a seasonal plant. And it is a fast-growing vine that creeps along the surface in a similar fashion as that of other Cucurbitaceae family vegetables and fruits such as cucumber, squash and so on. Pumpkin is a good source of vitamin A, vitamin C, energy and other nutrients like water, carbohydrate, fat, protein and such other.


Health Benefits:

1. Pumpkin contains  potassium, antioxidant, beta carotene properties which is very helpful to our health grow.
2. As pumpkin contains huge quantity of water that makes you feel full for hours and keeps you hydrated. And thus it is low in calories and helps to loss weight for a perfect diet.
3. Pumpkin is very useful to remove optical problems  and therefore maintains the eye health.
4. Pumpkin pulp and seeds both are high in vitamin C and beta-carotene. These offer a boost to the immune system using a powerful combination of nutrients.
5. It helps to protect the heart from ailments. Also, a good intake of potassium is proven to reduce the risk of stroke. And the magnesium and fiber in it is essential to our heart health.
6. Pumpkin may helps to control the diabetes.
7. It reduces the risk of cancer.
8. The pumpkin seeds are rich in zinc, and it raises testosterone levels. So it has the power to boost the male sexual health.
9. Pumpkin will also help reduce one of the more common symptoms of pregnancy which known as dreaded constipation.
10. Pumpkins are rich in tryptophan, they could also act as a sleep stimulants.
11. Pumpkin, mainly the seeds helps to reduce the inflammation.
12. Pumpkins are very helpful to women's health. It reduces the risk of bladder stones. And it is also helpful to the women who have menopause. 

Wednesday, 13 June 2018

Spiny or Karol ,Kantol Germination Care Use and its Health Benefits


Description:

Spiny Gourd or Kantola is a vegetable, also popular as Teasle Gourd. It is mostly cultivated in the mountain regions of India. Spiny Gourd is comes from “Cucurbitaceous”.  It has tiny spines all over its body. These are dark green in color and change color when get ripe from light green to yellow. Size of Spiny Gourd is normally 2-3 cm diameter. One cannot deny the health benefits of this vegetable.

Seed Sowing and Germination

Kantola does not need much effort, in a 20 liter pot you can grow 3-4 plants. The distance between plants needs to be approximately 4-5 inch, so that roots of all plants can spread well in all directions. For sowing the seeds it is a good idea to soak the seeds over night with warm water . Soaking seeds helps in faster germination, but is is not a compulsory step. Mark your spots where you’ll be sowing your seeds in the pot. Now make 3/4 inch to 1 inch holes in the soil using one of your fingers. Place the seeds on their side in the holes and them cover them loosely with the potting soil. Water the pot gently. Be careful not to disturb the soil. Check the moisture in the soil everyday. Don’t let the soil dry out any time. In about 3-5 days you should see happy seedlings looking out from the pots.
An optimum temp. of 27 to 33 ‘C is considered as the best temp for better development of Kantola plant.

Sowing Season

In India, Spine gourd or Kantola farming can be done in summer and also in monsoon. It is sown in the month of July to Aug.

Sowing and spacing

Sow seed 2 cm deep inside the prepared bed, 2-3 seeds per bed for better farming.
However, keep proper spacing to obtain a good result in any commercial crop. Row to Row distance about 2 m and Planting plant 60 to 70 cm apart from each other is supposed to be the best spacing for commercial spine gourd farming.

Irrigation for Spine Gourd Cultivation

Timely and proper irrigation in Kantola farming helps you to raise your production. After sowing of seed, give water immediately with  any diluted fungicide water.
But, give water as they need and is also vary from region to region and climate condition. In summer, frequent water is necessary and there is no need of water in monsoon. However, give water if required.

Organic fertilizers

Cow dung manure is  very  ideal. Apply it at land preparation time or at last plow.

Inorganic fertilizers

To achieve maximum yield, your soil should have sufficient nutrition and also have a good fertile power. However, in Kantola farming, application of N, P, K with a ratio of 120:80:80 kg per hectare before sowing seed or planting with the help of tubers on the field is considered as the best soil treatment.
But take care while application of it. Phosphorous and Potassium should be applied at the single time and apply nitrogen in two equal doses; half at a flowering time and the remaining at vining.

Weed Control in Spine Gourd Cultivation

Removal of weed in Spine gourd farming is should be done on the regular basis like at an interval of seven days.

Pest in Spine gourd Cultivation

Nematodes & fruit flies are the common pest that is found in the Kantola farming.

Health  Benefits:-

1. Spiny Gourd is great source of phytonutrients and low in calories. Spiny Gourd contains only 17 cal per 100g. It also contains other nutrients like dietary fiber, minerals, vitamins & anti-oxidant.

2.  One of the causes of cancer is presence of excess toxic free radicals in our body. Fresh dark green pods of spiny gourd are source of vitamin-C, which is itself known as the excellent natural antioxidant. Vitamin-C hunts down excess toxic free radicals from our body to reduce the chances of cancer.

3.  As we know this vegetable is high in phytonutrients, polypeptide-P, plant insulin and charantin that boost the glycogen synthesis in the cells of liver, muscle and adipose tissue.

4. If a pregnant mother include fresh green pods of Kantola in her meals during the pregnancy period, then it reduces the chance of neural tube defects as Kantola has about 72 mcg/100g of folates.

5. Spiny gourd also has different benefiting flavonoids such as beta-carotene, alpha-carotene, lutein, and zeaxanthins that are known as protective scavengers against oxygen-derived free radicals and reactive oxygen species. All these compounds will help you to look younger by working as the anti-aging compound. It helps you to keep your skin healthy.

6. Coughing is the common problem that seen in the children and adults due to instant change in climate or due to virus and bacteria. If you are suffering due to coughing, then you can take 3 grams of powdered kantola thrice in a day with water to control the non-stop coughing.

7. It contains high amount of Vitamin A that is very necessary for better eyesight. You can also eat spiny gourd in their season to improve your eyesight.

8. Daily drinking of 10 g of spiny gourd power and 1 glass of milk or water can also decreases kidney stone of kidney and bladder.

Wednesday, 17 January 2018

Bottle Gourd Essential Vegetables Care , Growing Use and its Health Benefits


The bottle gourd is yellowish-green in colour and has a vine grown for its fruit.. The vegetable has a white pulp, with white seeds embedded in the spongy flesh.

 Health Benefits:-

1. Skin Care:
The high intake of Vitamin C reduces the wrinkles and dryness of skin. Vitamin C is an antioxidant which can lower the oxidative damage associated with stress, pollution and poor diet. Free radicals speeds up the process of aging whereas the adequate consumption of Vitamin C slows down the appearance.

2. Healthy Heart:
Calabash or Lauki (Bottle Gourd) is known to be healthy enough for your heart. It aids in reducing high blood pressure and thus keeps your heart healthy. Presence of minerals like sodium, potassium and other essential minerals and trace elements helps in regulating blood pressure and prevent the risk of heart problems.

3. Hair Health:
 It is also known to be beneficial for hair health. It is believed that drinking one glass of lauki juice in the morning aids in treating greying of hair.

4. Control blood pressure:
High Blood Pressure is common for many people. This can be reduced by often drinking gourd juice. Normal blood pressure is a good sign of health and high blood pressure can be managed well with proper diet and timely consumption of bottle gourd juice.

5. Treats Cancer:
The high intakes of Vitamin C increase the cancer counteract effects of drugs that are used in chemotherapy. Vitamin C targets the cells that need the nutriments whereas the drugs harm the normal cells as well. Researchers view that Vitamin C is an effective cancer treatment for the lung and ovarian cancer.

6. Hormonal Balance:
Zinc plays a vital role in the production of hormones such as increase in testosterone. Zinc affects the female sex hormones and also involves in the creation as well as release of eggs from the ovaries. Zinc is essential for the estrogen and progesterone production in women that assist the reproductive health. The level of estrogen either too high or too low leads to the problems with menstruation, early menopause, mood swings, infertility and increase chances of cancers.

7. Helps treat Hypertension:
Bottle Gourd has rich amount of sodium, and potassium and is thus known to be a wonderful fleshy vegetable for patients suffering from hypertension.

8. Treating diarrhea:
Taking Calabash or Lauki (Bottle Gourd) with a pinch of salt, helps in maintaining the electrolyte balance in the body. This is also an excellent home remedy for people suffering from diarrhea.

Wednesday, 3 January 2018

Kohlrabi Seeds Germination ,Growing ,Care Use and its Health Benefits


SOWING KOHLRABI SEED INSIDE:

This is the easiest method for a spring sowing although for an autumn crop the seed should be sown directly.

Instructions:
  • Over fill the seed module tray with good quality multi-purpose compost with the lumps removed.
  • Firmly tap the tray on a solid surface to settle the compost. Scrape away the excess compost from the surface so that the compost is level with the top of the modules.
  • Use a pencil or your finger to make a hole in the compost of each module about 2cm deep.
  • Drop one seed into each hole and sprinkle in a little compost over the seed so that the compost is again level with the top of the module.Water the compost.
  • Place the seeds on a windowsill or any light and airy position where the temperature is in the range 50°F / 10°C to 80°F / 27°C, room temperature is ideal. Kohlrabi seeds will germinate in temperatures as low as 40°F / 4.5°C.
  • The seeds will germinate in about 10 days and be ready for planting outside in four weeks.

HARDEN OFF KOHLRABI SEEDLINGS:

The plants will be ready for hardening off about four weeks after sowing seed. Hardening off is simply the process of gradually acclimatizing the plants to outside conditions and should take a week or so. The plants will be about 8cm high when they are ready for planting out.

PLANTING OUT KOHLRABI:

Tip the plant out of the module and plant it in the ground (in the soil media) gently firming the soil around it. Each plant should be 30cm / 1ft apart and if planting more than one row, the rows should be 25cm / 10in apart. This is particularly important because the edible part of kohlrabi is the stem just above soil level which swells into a small ball shape. If the stem where the ball forms is partially or fully below soil level it will rot.

SOWING KOHLRABI SEED OUTSIDE:

Kohlrabi can be sown outside either for an early summer or an autumn crop. Kohlrabi has an excellent germination rate even in cold conditions so there is no need to sow the seeds densely. Before sowing prepare the soil media. Make a groove in the soil about 1 to 2cm deep and sow one seed every 5cm / 2in. Cover with soil with compost and sprinkle water.

TAKING CARE OF KOHLRABI:

Do water the plants in dry weather conditions because lack of water will lead to woody stems. They need more water compared to most other plants.

To help with water retention a mulch around them will do wonders. Grass cuttings are an ideal and cheap solution which will slowly rot down and provide a small amount of nitrogen feed.

Saturday, 4 March 2017

Beans Germination ,Growing ,Care, Use and its Health Benefits.


The beans are also known as French beans. Beans are one of those vegetables which grow long. Especially it grows in winter. It has many colours like Black beans, Pink beans and Yellow wax beans. Almost all the varieties of beans can be available year-round across the world.
Biennials are sown like half-hardy annuals or perennials in spring or fall and planted out in September and October. Winter annuals such as some Californian and desert plants may be grown in summer, but are at their best sown in fall, even if grown in the greenhouse in cold winter areas.


GERMINATION

Beans are one of those vegetables which grow very fast all the season. Most vegetables are indifferent to whether they have light or darkness when germinating. Its seeds are very sensitive, it can be sowed directed to the soil.


Choose a field where you want to sow your seeds. Or you can make on the seedling tray.Dig on the ground to make different row where the plants will grow well.
Dig one end of the row to the depth of your shovel, put that soil at the other end of the row, This way the soil will  be loosened. Dig the space next to that, putting the removed soil in the first space. Continue digging down the row for  loosening the soil at the bottom of each hole, until you put the first soil you removed in the other end of the row.  This process is known as double digging. Do this in an area of the vegetable garden that receives full sun when it is dry enough to work in the spring. Let the soil rest for a few weeks.

Sow the bean seeds six inches apart and 1 inch deep, slightly less if you have clay soil.Use three seeds for one plant. Sprinkle water very lightly and carefully on the seeds keeping the soil moist, but not soggy until the green bean seeds germinate.Now, wait for six to seven days for germination.

BENEFITS OF BEANS

1.Green beans contain excellent levels of vitamin-A, and health-promoting flavouring polyphenolic antioxidants such as lutein, zeaxanthin, and β -carotene in right amounts.

2.Raw fresh green beans also called as snap beans or French beans, should be tender, long, stiff, but flexible and give snap sound when broken. Buy them from organic stores for their delicious beany flavour.

3.Fresh green beans are very low in calories (31 calories per 100 g of raw bean pods) and contain no saturated fat. Nevertheless, these lean pod vegetables are an excellent source of vitamins, minerals, and plant-derived micro-nutrients.


Tuesday, 28 February 2017

Appple kul Plantation ,Growing ,Care, Use and its Surprising Health Benefits.


Apple kul is a hybrid fruit has become famous profitable cultivation in West Bengal.Basically, its seeds are partially big and it can be sow directly to the soil. It likes full sun, good weather and water also.

Specification of Apple kul

location and soil

Kul loves the sunny and warm exposure. It is a tropical plant but very much adaptable to temperate climates with moderate winter, when grown on the ground.

For growing apple kul in pots choose a quality potting mix or make your own substrate using equal parts compost, sand, and soil.

It is comfortable with soft soil like “Dnoash Mati” and “Poli mati”.It can also be grown in hard soil but need special care. Soil should be prepared earlier with power tiller and need “Do-chaas”.

Seed 

It is best to use by mixing 2gms of fungicide in 10-litre water and spray it on the soil before sowing seeds. Or use in any plant at first time when you place in soil or repot.


Plant: Baby plant should be collected from the nursery. They will supply each baby plant in 6 to 12-inches tub. Care should be taken during transportation because the plant is very soft.

Plantation: After that, the plant should remove carefully from the tub and be placed in a land whose soil is prepared the prior or mixed soil. Keep distance 4 feet from each other plant is good and it’s better to maintain a row. Watering to be done properly after plantation.

Nursing: Watering the field regular basis in morning or evening. Apply organic fertilizer 1-month interval for the baby plant in very little quantity.

Growing rate: If the soil is prepared properly then the plantation of the plant will grow at very good rate after one month.The plant generally grows enough within one year that it will give fruit.


Fencing: As the plant is very soft so it required fence that should be arranged for the support of the growing trees. A bird can damage your fruit in the night.

Health Benefits of Apple kul

Apple kul has following benefits

1. Apple is enriched with full of vitamins like Vitamin C, A B1, B2, B6 and calcium, phosphorus, magnesium, potassium, and iron.

2. On top of that, they contain the highest level of pectin ammo fruits an extremely valuable compound that is being more researched these days for its huge medical benefits.

3.Apple has another benefit as it helps to protect out teeth. Malic acid present in apples which helps in
cleaning the stains affecting the teeth.


Monday, 27 February 2017

Kohlrabi Germination ,Growing ,Care, Use and its Health Benefits.


Kohlrabi is a fast-growing vegetable and good tastes too. Kohlrabi is a perennial and cool seasonal vegetable.It is capable of all type of temperature but most growth will occur in winter.There are two types of Kohlrabi -one is purple and the other is white. Kohlrabi is sweeter than the other cabbage family.


SPECIFICATION OF KOHLRABI

LOCATION

Full sun and a well-draining pattern are good for kohlrabi.Kohlrabi prefers a soil within the 5.5 gm 6.8 range. Work aged compost into planting beds before sowing.

TIME

Kohlrabi takes time to grow, it requires 45 to 60 days to reach maturity. Though it is a cool weather crop but too cold is harmful to it. It should be sowed in the garden 3 to 4 weeks before the last average frost date in spring. In warm winter regions, sow kohlrabi in late summer for winter harvest. Kohlrabi can withstand an early autumn frost. In cold winter regions, sow kohlrabi in summer for early autumn harvest.


USE FUNGICIDE

It is best to use by mixing 2gms of fungicide in 10-litre water and spray it on the soil before sowing seeds. Or use in any plant at first time when you place in soil or repot.


PLANT SPACING

 Sow kohlrabi seed ½ inch deep and 1 inch apart; thin successful seedlings from 5 to 8 inches apart. Space rows 18 to 24 inches apart. Thinned seedlings can be transplanted to another part of the garden.

IMPORTANT WATERING USE: Use watering as it required.Keep soil evenly moist for quick growth. Kohlrabi that goes without water will become woody. By moving the water stream constantly waves the can. Do not let the water to flood area. Or use sprayer to spray the water like mist

HARVESTING

  Kohlrabi needs to harvest.It will ready for harvest when stems reach 2 to 3 inches in diameter.


Saturday, 25 February 2017

Pomelo -How to peal a Pomelo Germination ,Growing ,Care, Use and its Health Benefits.

How to peal a Pomelo :

Step 1
At first, we need a cutter  to cut about 1/2 an inch into the rind.
 
Step 2
Cut the top of the pomelo off until you can almost see the fruit inside.Dig your fingers underneath the slice at the top (where you cut the cap) and pull each one firmly away.

Step 3
Remove the  skin lengthwise around the pomelo by  hand . It’s quite a thick skin so you want to cut through quite deeply before.
Step 4
 Break it into wedges and serve.

Friday, 24 February 2017

Pomelo Fruit Germination ,Growing ,Care, Use and its Surprising Health Benefits.


Pomelo is a subtropical and largest fruit tree. It likes warm climate and grows especially in summer. Pomelo fruit has sweet flesh and thick rind.Though it does not like cold weather if you want to grow it in cold season then it should be placed in a pot.It can be grown from seed which may not look the same as their parent.


BENEFITS OF POMELO

Pomelo has following benefits

 1. Pomelo fights against UTI (Urinary Tract Infection). Basically UTI is an infection which is caused by bacteria. It has the job of storing and eliminating urinary. Drinking pomelo juice is very good for those women who are pregnant. Due to high Vitamin C in it, helps to increase the acidity of urine to defend infection.

 2. Pomelo juice is also helpful to reduce the risk of stroke and heart attack. It contains high levels of potassium which regulates blood pressure and reduces bad cholesterol in human body.

3. Pomelo contains high levels of potassium and magnesium which helps to muscle cramps. Adding pomelo fruit daily in diet, it will increase leg cramps. Most importantly it can interact very badly with numerous drugs.

4. The pomelo fruit is rich in bioflavonoids, an antioxidant that obstructs especially from the breast,  intestinal, colon, and pancreatic cancers. It helps to eliminate the excess estrogen from the body and preventing cancer from spreading which can protect the body from cell damage.

5.Pomelo is also full of fibre which is very helpful to those people who want lose weight. As we know most of the calories are burned due to fibre that causes losing weight.

6.Potassium found in pomelo that has been connected to bone mineral density. Eating pomelos three times in a week will strengthen bones and preventing osteoporosis.

7.Pomelo also works as an antibody. It stimulates immune cells to guard the body against bacteria that cause cold, flu, asthma and allergies.


Tuesday, 21 February 2017

Snake Gourd Seeds Germination ,Growing ,Care, Use and its Health Benefits.


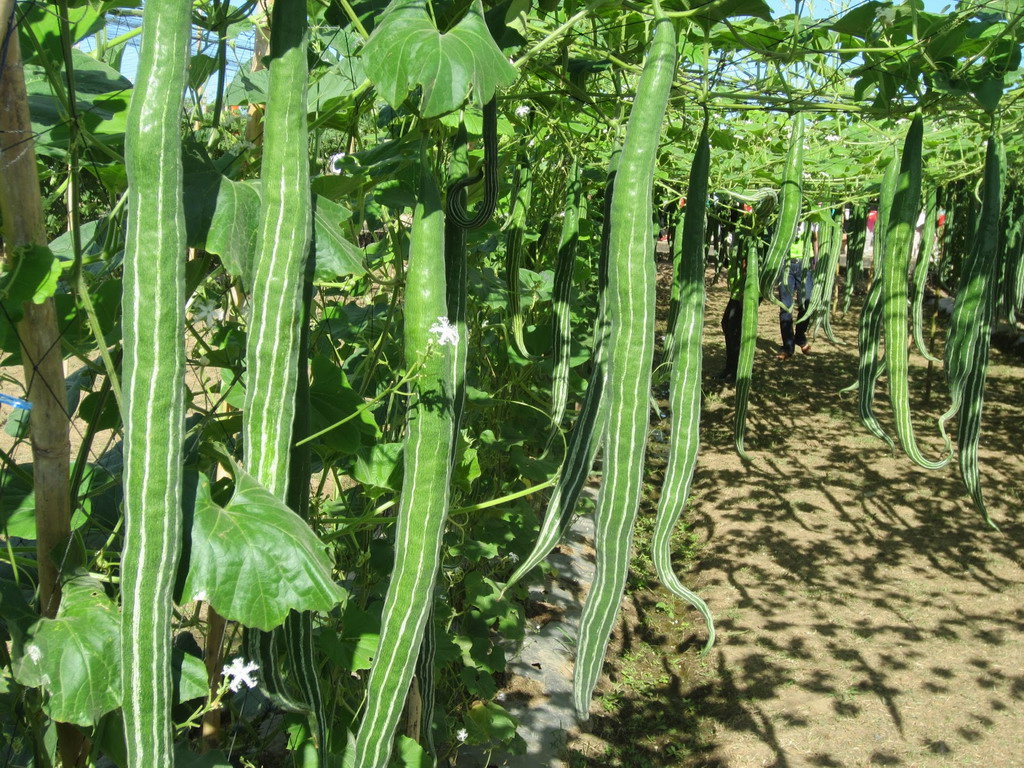
 Snake gourd belongs to a large vegetable family and of course, it is a climbing plant by nature.  It produces long and curved fruits that appear like snake hanging on the ground.It is a subtropical plant and very easy to grow fast from seed. It likes warm climate and produces lots of fruit for a long time.Snake gourd is very ethnic in India especially North and it belongs cucumber family.

SPECIFICATION OF SNAKE GOURD


Height: vining

Environment: partial shade
Soil Type: Loamy, well-drained, pH 6.1 - 7.8

Average Germ Time: 14 - 21 days

Depth: 1/4 inch

Moisture: Keep seeds moist until germination

 BIENNIAL PLANT

Biennials are sown like half-hardy annuals or perennials in spring or fall and planted out in September and October. Winter annuals such as some Californian and desert plants may be grown in summer, but are at their best sown in fall, even if grown in the greenhouse in cold winter areas.


   USE FUNGICIDE

It is best to use by mixing 2gms of fungicide in 10-litre water and spray it on the soil before sowing seeds. Or use in any plant at first time when you place in soil or repot.


 GERMINATION

 Snake gourd is very easy to grow from seed. Its seed can be shown directly to the soil.

1.Sprinkle diluted fungicide water (2gm in 1-litre water) after sowing the seeds.We have to care about putting the seed because seeds will not go deep into the mixture.


Snake Gourd seeds are notoriously slow to germinate and sprout.  Then you need to rough up the surface of each snake gourd seed in order to speed up their germination and growth. Then you need to soak the selected the seeds in water for full 24 hours before planting them. Select a place which receives six or more hours of direct sunlight to plant the seeds. The soil should be well-drained and well worked and enough rich soil.

This plant need strong support to prevent their fruits from touching the ground. Therefore it is recommended to create a fence. After sowing the seeds in the soil with 3 inches of peat moss, 2 inches of compost and 1 inch of perlite. Then you need to make sure the soil is warm enough in order to support the germination process.

You need to plan sow the seeds during spring. Need to push the soil to a depth of half inch by hand.Sow the seeds  apart  12 inches between the seeds. Everything as  order  get the opportunity to yield the vegetable in 2 months’ time. To  make it  more length knot a string down word the fruits with  a little weight.Then it will  be straight and lengthy.

USES OF SNAKE GOURD

The followings are a few advantages of snake gourd -

1.The juice of the snake gourd fruit may be used to not just deal with dandruff but in addition helps to avoid the signs and symptoms of the condition.

2.The leaves of the plant are helpful just as one emetic as well as purgative in youngsters struggling with bowel problems.

3.It really is abundant with proteins, vitamins A, B and C in addition to minerals.

Koromcha or Caronda Germination ,Growing ,Care, Use and its Surprising Health Benefits.


Caronda is a perennial evergreen plant. It needs subtropical climate until available grows up.Its seed will be available in 3 weeks time.Caronda can be also termed as an ornamental plant.Its fruits are oval type.It is a bushy  or small tree, with strong, simple or forked thorns in pairs. The plant attains a height of 6-10ft. It is met with throughout India, Burma, Ceylon and Malacca, mostly on sandy or rocky soil in a wild state. Leaves are evergreen, elliptic, or oval, opposite, dark green, leathery, glossy, on the upper surface, light green on under side.It is sometimes cultivated for its fruit.


SPECIFICATION OF CARONDA


Season: Perennial

Height:1 to 2 meters
Environment: Full sun
Soil Type: Loamy, well-drained, pH 6.1 - 7.8
Average Germ Time: 14 - 21 days
Depth: 1/4 inch

Moisture: Keep seeds moist until germination

GERMINATION OF CARONDA SEED

Step 1

Use a flat seedling tray and its deep will be 5 centimetres. Make sure you have plenty of holes in it for good water drainage.

Step 2

As the seeds are perfect in size then you can put the seeds over it by 1/3 after that cover the seeds with seedling mix only about 1 cm (one centimetre).


Step 3
 Take equal quantity of sand, soil and vermicompost. Then mix all the three ingredients into one container.

Step 4
  
Sprinkle diluted fungicide water (2gm in 1-liter water) after sowing the seeds.Be careful about putting the seed because seeds will not go deep into the mixture.


 Step 5
 Thereafter spread the Caronda seeds in the mixture.Make sure that the water must be mixed with diluted fungicide powder.It is very important to notice to follow that the seeds will not to go very deep inside the mixture by speeding water on the seed, if it happen then the fertilization of the seeds are become difficult.


Step 6
Minimum  warm, above 60ºF (15.5ºC), is needed inside the container and it should be placed in sunny area.After that the whole thing should be covered with a poly bag and after 21 days later the plastic can be removed.


The plant is grown from seed sown in August and September. Vegetative propagation also is practiced in the form of budding and inarching. Cuttings may also succeed. The first monsoon shower is planting time. Plants raised from seed start bearing two years after planting. Flowering starts in February and in Eastern  India the fruit ripens from May to Jully.The unripe fruit is sour and astringent, and is used for pickles. The ripe fruit is sweet, deible and particularly suitable for tarts and puddings and jellies.

WATER: Water requirement of Karonda is very low. Irrigation after planting and manuring is essential. Plantation once established does not need much water. However, if there is no rain during the development of fruit, one irrigation may be given. This will increase the fruit size.


MORE INFORMATION

Many of these germinate readily at warm temperatures, and can be sown direct to the garden or early in the greenhouse or cold frame. If started early, they often bloom the first year. Others germinate best at cool or cold temperatures and the seedlings need cool temperatures. Many have various dormancy and need the pre-treatment indicated.


These often need very warm temperatures. Bottom heat and constant moisture are often beneficial. Some take surprisingly long times to germinate. Many people think all tropical seeds are short-lived and perishable, but many of the longest-lived seeds are tropical, and some even need to be aged dry for a year before they will germinate!


SOIL

Many seeds do well sown direct to ordinary garden soil, but even good soil may be poor in pots or flats. These need a lighter, looser soil. Most commercial mixes are fine, but the addition of some garden soil and compost will often insure adequate beneficial micro-organisms and fungi, A good soil mix can be made at home from 1/3 garden loam, 1/3 peat or compost, and 1/3 gritty sand. Number 1 limestone chick-grit makes a good top dressing for many alpines or slow germinating seed to discourage algae growth. Crushed charcoal also helps.


BENEFITS

Karonda have the following benefits-

1.It provides comfort during Diarrhea.

2.It mitigates cough.

3.Koromcha helps to stop internal bleeding.

4.It is a cardio tonic for body. Thus it regulates heart function to avoid heart diseases.


Wednesday, 15 February 2017

Pumpkin Germination ,Growing ,Care, Use and its Health Benefits.


Pumpkin is a very common vegetable. It is a hot seasonal plant and it requires from 90 to 120 frost free days.Growing a pumpkin is easy, fun and rewarding.

SPECIFICATION OF PUMPKIN


Height: vining
Environment: partial shade
Soil Type: Loamy, well-drained, pH 6.1 - 7.8
Sowing Temperature: 20-25 C
Growing Temperature: 18- 38 C
Spacing: 50*60CM
Height when growing up: Sprawl
Grow up / Flower days: 90 days
Average Germ Time: 14 - 21 days
Fruit colour: green, yellow
Depth: 1/4 inch
Moisture: Keep seeds moist until germination
Plant Spacing: 8 - 12 inches

PUMPKIN SEED GERMINATION

For high yielding choice a site with full sun (to light shade) and lots of space for sprawling vines. Vine varieties need more area. Pumpkins are sown end of February eastern India and this is to make sure that the ground temperature is warm enough for germination.Make few holes and pure with manure.Sow three seeds in a  hole. Cover the seeds with side soil to maintain moisture in the soil. Seeds take 4 to 5 days for germination.
 

 Soak the seeds overnight and sowing direct on the prepared  soil.It will takes  4 to 5 days for sprouting.Pumpkin seeds won’t germinate in cold soil. Mound the soil in the centre of the chosen location up a bit to help the sun heat the pumpkin seeds. The warmer the soil, the faster the pumpkin seeds will germinate. In the mound, plant three to five pumpkin seeds about 1 inch deep.
As it is vine you need  to get support them .No need to do on the ground .So, on ground  sow 3 seeds forone and keep distance 4  feet between two  plants.Pumpkins should dig deep soil ploughing of 25-30 cm because of the plants with deep root systems. Should leave the soil exposed 5-7 days to kill pathogens and weed it. Should manure or compost To improve soil conditions incoherent. And increase the fertility of the soil.

FERTILIZING
Pumpkins are fast growers and heavy feeders and benefit from regular applications of fertilizer. Mature trees may require as much as 1/2 pound actual nitrogen per year. Apply fertilizer monthly, just prior to heavy pruning.


Saturday, 11 February 2017

Hibiscus Flower Germination ,Growing ,Care, Use and its Benefits.


Hibiscus is an Indian perennial flower. It is known for its large, showy flowers that come in a different range of shapes and colours.Its foliage looked like a large, glossy and yellow in color.It can be purchased or collected from the parent plants.


Sow in early spring for use as an annual
Plant in spring or autumn and grow them on in the greenhouse for their first year to plant them out in early summer of the following year.
For best germination soak seed in hot water for 48 hours before sowing. Change the water ever 12 hours with fresh hot water.
Sow in trays or pots of peaty compost, cover seeds with a sprinkling of sieved compost. Darkness will help germination. Place in a propagator or warm place, maintaining an optimum temperature of 24 to 27°C (75 to 80°F). Plants will flower in 12 weeks from sowing.


SPECIFICATION OF HIBISCUS

Bloom Color: Red,yellow,pink,white,gray
Environment: Full sun
Soil Type: Loamy, well-drained, pH 6.1 - 7.8
Temperature of 24 to 27°C (75 to 80°F)

Average Germ Time: 15 -30 days
Depth: 1/4 inch
Moisture: Keep seeds moist until germination
Sandy Soil, Loamy Soil, Clay Soil


GERMINATION GUIDE

 Hibiscus flower seed germination is not too complicated. Here are some following steps to germinate -

1. The seeds can be sowed 6-8weeks before the last frost is predicted.

2.Make sure that the water must be mixed with diluted fungicide powder.

3.This seed needs to nicking with a knife and then soaking them overnight in warm water.

4.Thereafter the flower seeds can be sowed into a small scalding tray or pot.It must be noticed that the drain pattern of the scalding tray well so that the poured water can be easily come out.

5. Then slowly cover the tray with a plastic polythene and keep the seeds moist not soggy.

6. Keep the temperature constantly warm and the soil consistently moist will aid germination.

7. When the seeds will grow up with small leaves then the plant can be moved to larger pots or direct to the soil.

8.These tender young plants should be introduced to the sun gradually over several days. At this point, a water-soluble fertilizer can be used.

BENEFITS OF HIBISCUS FLOWER

Hibiscus is a beneficial flower plant. Its different parts are used in many different sources. The tea of Hibiscus flower helps to maintain lowering cholesterol, protects the liver, work as anti-cancer properties, weight lose and many others.


Mexican Zinnia Seeds Germination ,Growing and Care.


Mexican Zinnia is beautiful native flower plant can grow to 24 inches. It is a hardy plant grows especially in summer.It needs full sun to germinate its seed.

SPECIFICATION OF MEXICAN ZINNIA


Indoors: March to April
Start indoors four to six weeks before the last frosts.
Gradually acclimatize indoor started seedlings outdoors after all danger of frost has passed and the weather has warmed considerably. Plant out 25 to 30cm (10 to 12in) apart.


GERMINATION GUIDE

  1. Sowing Outdoors in April to July.Dig in a good amount of organic material.
  2. Create a bed on the ground with vermicompost or take seedling tray and cover the tray with vermicompost.
  3. Add compost and all-purpose fertilizer before sowing.As because seeds of zinnia flowers can be sown directly into the sunny flower bed, as developing roots do not like to be disturbed.
  4. Sow the seeds in a container that can be planted directly into the garden later.
  5. Sow seeds after the last frost, and in an area with full of sun. Sow seeds 5 to 7cm (2 to 3in) apart in rows 30cm (12in) apart. Cover seeds with light soil.
  6. Keep soil moist until seeds germinate, in 5 to 10 days.
  7. Grow in fertile, rich, and well-drained soil
  8. Germinate within 7 - 14 days.
  9. the seeds in peat pots, poo pots (pots made from cow dung) or other biodegradable containers that can be planted directly into the garden later. Start seeds four to six weeks before the last frost date in your area.
  10. Read more about Gardening Know How: Zinnia Care – How To Grow Zinnia Flowers https://www.gardeningknowhow.com/ornamental/flowers/zinnia/growing-zinnia-flowers.htm


CARE AFTER GERMINATION


  • When plants are 3 to 5cm (1 to 2in) in height, transplant to 7cm (3in) pots and grow on. Gradually acclimatize indoor started seedlings outdoors after all danger of frost has passed and the weather has warmed considerably. Plant out 25 to 30cm (10 to 12in) apart.
  • Cut above a leaf node to get more flowers.


WATERING :

Watering it daily but do not over-water the plant.


Thursday, 2 February 2017

Pomegranate seed germination and its Wonderful Heath Benefits


Pomegranate plant comes in a shrub.It has large fruits and small flowers usually one inch in diameter which is red or orange.It likes good sunlight and good drainage system. The fruits are usually harvested in September and December.
SPECIFICATION OF POMEGRANATE
USDA Zones: 3 - 10
Height: 60 - 84 inches
Bloom Season: September to December
Environment: Full sun
Soil Type: Loamy, well-drained, pH 6.1 - 7.8
Temperature: 75 - 80F
Average Germ Time: 14 - 21 days
Depth: 1/4 inch
Moisture: Keep seeds moist until germination
Plant Spacing: 10 to 12 feet apart
Sandy Soil, Loamy Soil, Clay Soil
Sow Outdoors: Surface. Following the last frost. Spacing 4 to 24 inches (10 to 60 cm).
Sow Indoors: Mix seeds in a growing medium, place in a freezer bag, keep moist, then stratify by refrigeration for two to three weeks. Use peat pots. Germination time: one to three weeks in the light. Temperature 75°F (24°C). Seven or eight weeks in advance. Transplant outdoors in the last month of spring.
GERMINATION GUIDE
Step 1
Use a flat seedling tray and its deep will be 5 centimetres. Make sure you have plenty of holes in it for good water drainage.
Step 2
As the seeds are perfect in size then you can put the seeds over it by 1/3 after that cover the seeds with seedling mix only about 1 cm (one centimetre)
Step 3
Take equal quantity of sand, soil and vermicompost. Then mix all the three ingredients into one container.
Step 4

Sprinkle diluted fungicide water (2gm in 1-litre water) after sowing the seeds.
Step 5
Thereafter spread the Pomegranate seeds on the mixture. Make sure that the water must be mixed with diluted fungicide powder.It is very important to notice to follow that the seeds will not to go very deep inside the mixture by speeding water on the seed if it happens then the fertilization of the seeds are becoming difficult.
Step 6
Cover the seedling pot   tightly plastic polythene wrap over the pot to promote soil moisture retention and place it in a dimly light area of the house. Lift the plastic after 2  days to check that the soil is moist or not. If not, lightly moisten it with a water-filled spray bottle before replacing the plastic. Expect germination within three to five days.
Step 7
Remove the plastic as soon as the seedlings emerge, and gradually move the pot to a brighter area over a two-week period so that at the end of that time they're acclimated to being in full sunlight.
FERTILIZING
Pomegranates are fast growers and heavy feeders and benefit from regular applications of fertilizer. Mature trees may require as much as 1/2 pound actual nitrogen per year. Apply fertilizer monthly, just prior to heavy pruning.
IMPORTANT WATERING USE: Use watering can for watering. By moving the water stream constantly waves the can. Do not let the water to flood area. Or use the sprayer to spray the water like mist.

Heath Benefits of Pomegranate


It is one of the healthiest fruits in the  world . It has many incredible health benefits . It  has rich anti-oxidant, anti-viral and anti-tumor properties and is said to be a good source of vitamins.Especially with  vitamin A, vitamin C, and vitamin E, also with folic acid.
1. Protects us from free radicals work for Anti Ageing

Pomegranate is rich in anti-oxidants and  protects our body from free radicals, which are responsible for premature ageing.
2. It thins your blood
Antioxidants present in pomegranate act as a 'thinner for your blood'. The seeds of pomegranate prevent your blood platelets from forming clots and coagulating.
There are two types of blood clots, first is the good one which speeds the recovery during a cut or an injury and second is when there is any internal clot, like in heart, arteries or anywhere else inside the body. These type of clots are not good and can be fatal.

3.
It acts like an oxygen mask

The anti-oxidant property of pomegranate prevents bad cholesterol from oxidizing. Due to anti-oxidants present in pomegranate, it fights to free radicals and  reduces cholesterol and also prevents the blood clot.Pomegranate helps to pump the level of oxygen in our blood. So, eating regular pomegranates removes the excess fat and prevents the Heart Attack.

4. It prevents arthritis

Pomegranate can reduce the damage of the cartilage by fighting the enzyme that does so. Pomegranate also has the ability to reduce inflammation.
5. Boosts immunity
Pomegranates are extremely healthy for those suffering from immune-related disorders like rheumatoid arthritis and osteroarthrits. And also rich in vitamin C, which boosts antibody production and helps in the development of immunity. Pomegranates can  help to maintain a healthy immune system .
6. Fights heart disease and prostate cancer

Two studies claim that pomegranate juice has the ability to fight prostate cancer. Pomegranate juice  prevents cardiovascular diseases.
7. Rich  nutrients with  pomegranate
A cup of pomegranate seed contains 24 grams of sugar and 144 calories.
A cup of pomegranate seeds contain following nutrients:
Fiber: 7 grams
Protein: 3 grams
Folate: 16 %
Potassium: 12 %
Vitamin C: 30 %
Vitamin K: 36 %
8. It improves memory

People who had a problem with their memory were given 237ml of pomegranate juice every day. After a certain period of time, a lot of improvement was seen in their verbal and visual memory.  Pomegranate consumption can also prevent Alzheimer's.

9. It keeps lowers blood pressure
It  help to lower cholesterol, triglycerides and reduce blood pressure.
 
10. Helps in digestion

As pomegranate with rich fiber is good for digestion. One pomegranate contains 45 per cent of our daily recommended intake of fiber.

Nigella plant Germination ,Growing ,Care, and Uses.


Nigella is a colourful annual flower. It has many different colours like 
 pale blue, white, pink etc.

SPECIFICATION OF NIGELLA


Difficulty Easy
Exposure: Full sun
Season: Half hardy annual.
USDA Zones: 3 - 10
Height: 8 to 20 inches (20 to 50 cm).
Bloom Season: Summer through fall
Environment: Full sun
Soil Type: Loamy, well-drained, pH 6.1 - 7.8
Average Germ Time: 14 - 21 days
Sowing Temperature: 20--25C
Growing Temperature: 18--35C
Grow up / Flower days : 80days
Spacing:15×15cm
Colour of Flower: Light blue
Depth: 1/4 inch
Moisture: Keep seeds moist until germination
Plant Spacing: 20-30cm (8-12″).
Soil: Fertile, well-drained soil.
Optimal soil temperature for germination: 18-21°C (65-70°F). Seeds should sprout in 8-15 days.


 GERMINATION GUIDE :

Step 1

Use a flat seedling tray and its deep will be 10 centimetres, and fill seedling mediator within 3/4  of the rim with a sterile potting soil or sieved vermicompost. Fill the tray with diluted fungicide water (2gm in 1-litre water). Make sure you have plenty of holes in it for good water drainage. And  Allow the soil in the flat to absorb the water through the bottom drainage holes until the soil surface becomes moist.

 Step 2

Sow the seeds in prepared beds and gently press them into the surface. Keep moist until the seeds germinate. Because of their lacy foliage, nigella seedlings are easy to recognize among weeds. Nigella usually grows better from direct-sown seeds than from transplanted seedlings.Keep the distance 11" with the other plants.Try to sow seeds two or three times from late spring to early summer, because they stay  only few weeks. Flower colours include white, blue, pink and purple.

Step 3
Moist again with diluted fungicide water ensure the soil surface it's evenly moist. Cover tightly plastic polythene wrap over the pot to promote soil moisture retention and place it in a 60 to 70 degree Fahrenheit location or in an artificial area of the house that receives indirect light to germinate if it planted in a seedling pot. Lift the plastic after two days  to check that the soil is moist or not. If not, lightly moisten it with a water-filled spray bottle before replacing the plastic.


Step 4
 
The Nigella usually sprout within14 to 21 days.Remove the plastic as soon as the seedlings emerge, and gradually move the pot to a brighter area with six to eight hours of daily sunlight for a two-week period so that at the end of that time they're acclimated to being in full sunlight. Water the seedlings when the soil surface feels dry.

 Step 5

Transplant the Nigella outdoors or in a new pot when they are about 4 weeks old and about 4 to 6 inches tall. Plant at them 6 to 8 inches apart on the ready ground with same depth were they growing at previously.


GERMINATION CARE
After the seedlings germinate, they can relocate to a sunny south- or west-facing window. The soil is kept moist at all times, but not allowed to get soggy. Once the seedlings have three true leaves, they are fed every two weeks with a liquid houseplant fertilizer. Pinching out the growth tips isn't necessary.


IMPORTANT WATERING USE: Use watering can for watering. By moving the water stream constantly waves the can. Do not let the water to flood area. Or use sprayer to spray the water like mist


Tuesday, 31 January 2017

Capsicum Seed Germination ,Growing ,Care, Use and its Health Benefits.


 Capsicum is a vegetable which usually used as an ornamental fruit. It is an annual plant, however, be grown as perennials in tropical regions where temperatures remain between 60 and 85 degrees Fahrenheit year round.


SPECIFICATION OF CAPSICUM

Plant Features:

    Common name: Capsicum
    Botanical Name: Capsicum annum
    Other names: Sweet Pepper, Cayenne Pepper, Paprika
    Indian names: Shimla Mirch (Hindi)
    Vegetable type: Fruit Vegetable
    Varieties: Green, Red, Yellow, Purple, Orange, WhiteSeason: Annual
    USDA Zones: 3 - 10
    Height: 60 - 84 inches
    Flower colour: white
    Bloom Season: Summer through fall
    Bloom Color: Yellow, red, green etc
    Environment: Full sun
    Foliage: densely branched
    Soil Type: Loamy, well-drained, pH 6.1 - 7.8
    Temperature: 75 - 80F
    Average Germ Time: 14 - 21 days
    Width/Spacing: 20 to 30 cm
    Depth: 1/4 inch

    Moisture: Keep seeds moist until germination


    GERMINATION GUIDE

    Make sure you have a good place to grow your capsicums. They need a sunny place to grow with some air flow so they don’t succumb to fungal diseases. If you don’t have a lot of room you can plant them in large pots or along a wall as long as there is a breeze.

    Use a flat seedling tray and its deep will be 5 centimetres. Make sure you have plenty of holes in it for good water drainage.

    Start with a pot or tray of good seedling mix from your garden centre (not ordinary garden soil from your backyard). 

     or

    Take equal quantity of sand, soil and vermiculite. Then mix all the three ingredients into one container. 
    Sprinkle diluted fungicide water (2gm in 1-litre water) after sowing the seeds.Plant your seeds in pots so it is easy to transplant them into their final place.

    Tickle the top of the soil with your fingers, then sprinkle your seeds over the top and add a little more soil to cover. Give them a little water, just enough to keep the soil damp, but not too wet. When they are around 10-15cm tall.

    Your capsicum seeds will not germinate until the temperature of the soil is right. They prefer a temperature of around 20 to 25°C before they will break dormancy, and they must not be planted outside until all chance of frost is over.

    Make sure that the water must be mixed with diluted fungicide powder.It is very important to notice to follow that the seeds will not to go very deep inside the mixture by speeding water on the seed if it happens then the fertilization of the seeds become difficult.

    Need to routine  check about the soil moist or not. If not, lightly moisten it with a water-filled spray. Expect germination within three to five days.


    If you want to start them a few weeks before the expected date of your last frost you can plant the seeds in pots and place them inside on a warm, sunny windowsill, or you can buy an electric seed starting tray at any garden or hardware store.


    Pests
    The main pests that attack capsicums are aphids and whitefly. Aphids are little bugs that suck sap from the tips of the plant shoots and whitefly are tiny white bugs that fly around when you disturb your plants. Aphids can be controlled with pyrethrum spray or soapy water and whitefly can be caught on pieces of bright yellow card coated with a thin layer of petroleum jelly. They are both pests that can damage your capsicums and spread diseases.Or treat them using organic pesticides like Neem Oil. In areas with higher humidity levels, good plant spacing is essential to ensure air flow and help minimise the number of potential mould problems.

    Harvest season:

    Capsicum will be ready for harvest about 2 months from planting. Capsicum of hybrid varieties start green and then mature to their original colour. The great thing about capsicums is that they bear right through the season until they are killed by frosts. You can harvest the capsicums and chillis at any stage when they are green, or wait till they turn their ripe colour, which is usually red or yellow, at which time they will have a stronger flavour. Most varieties can be picked a little unripe and will still fully ripen on a windowsill.


    Propagation:
    Capsicum can be propagated by seeds from a healthy harvest. However, seeds for next season will not develop in hybrid varieties.Capsicum loves the sunny and warm exposure. It is a tropical plant but very much adaptable to temperate climates with moderate winter, when grown on the ground
    GERMINATION CARE
    After the seedlings germinate, they can relocate to a sunny south- or west-facing window. The soil is kept moist at all times, but not allowed to get soggy. Once the seedlings have three true leaves, they are fed every two weeks with a liquid houseplant fertilizer. Pinching out the growth tips isn't necessary.


    Friday, 13 January 2017

    Red Chili Germination ,Growing ,Care, Use and its Surprising Health Benefits.


    Chili is very essential in kitchen.Red chili is a restaurant for whole family.It is a small plant.It grows well in hot climates.It can be turned in many colors like yellow, red, purple etc.


    SPECIFICATION OF RED CHILLI


    Season: Annual

    USDA Zones: 3 - 10

    Height: 1meter

    Bloom Season: Summer through fall

    Environment: Full sun

    Soil Type: Loamy, well-drained, pH 6.1 - 7.8

    Temperature: 75 - 80F

    Average Germ Time: 14 - 21 days

    Depth: 1/4 inch

    Sowing Rate: 3 seeds per plant

    Moisture: Keep seeds moist until germination

    Plant Spacing: 8 - 12 inches


    GERMINATION GUIDE


    Step 1

    Use a flat seedling tray and its deep will be 5 centimeter. Make sure you have plenty of holes in it for good water drainage.


    Step 2

    As the seeds are perfect in size then you can put the seeds over it by 1/3 after that cover the seeds with seedling mix only about 1 cm (one centimeter)


    Step 3

    Take equal quantity of sand, soil and vermicompost. Then mix all the three ingredients into one container.


    Step 4

    Sprinkle diluted fungicide water (2gm in 1 liter water) after sowing the seeds.We have to careful about putting the seed because seeds will not to go deep inside the mixture.


    Step 5

    Thereafter spreed the Red chili seeds on the mixture. If your seeds are so tiny then you can spreed water very lightly and carefully on the seed.Make sure that the water must be mixed with diluted fungicide powder.It is very important notice to follow that the seeds will not to go very deep inside the mixture by speeding water on the seed, if it happen then the fertilization of the seeds are become difficult.


    Step 6

    Cover tightly plastic polythene wrap over the pot to promote soil moisture retention and place it in a dimly lit area of the house. Lift the plastic daily to check that the soil is moist. If not, lightly moisten it with a water-filled spray bottle before replacing the plastic. Expect germination within three to five days.


    Step 7

    Remove the plastic as soon as the seedlings emerge, and gradually move the pot to a brighter area over a two-week period so that at the end of that time they're acclimated to being in full sunlight.


    Step 8

    Minimum warm, above 60ºF (15.5ºC),is needed inside the container and it should be placed in sunny area.After that the whole thing should be covered with a poly bag and after 21 days later the plastic can be removed.

    Step 9

    watering can as it is required. place the container in semi shaded place. Red chili needs a proper sunny area to germinate it.


    BENEFITS OF RED CHILLI


    Chilli contains lot of vitamins like vitamin A,B,C etc. Chilli pepper works as a potent- inflammatory agent. Chilli pepper is packed with a range of nutritional properties which makes us healthy .From following points we can be benefited


    1. Improves Cognitive Functioning

    2. Contributes To Red Blood Cell Formation

    3. Reduce Blood Pressure and Prevents Cardiovascular Disease

    4. Acts as Natural Pain Relief

    5. Clears Nasal Congestion

    6. Soothe Intestinal Diseases And Disorders

    7. Boosts Immunity

    8. Maintain Healthy Eyes

    9. Inhibits Cancer

    10. Chilli Pepper Can Help Prevent Stomach Ulcers

    11. Promotes Weight Loss

    12. Improve Longevity


    Onion Seed germination


                                         Onion seeds & Health Benefits

    Onions are part of the allium family of vegetables and herbs, which also includes chives, garlic, scallions, and leeks. Allium vegetables have been cultivated for centuries for their characteristic, pungent flavors and for their medicinal properties.

    Onions can vary in size, shape, color, and flavor. The most common types are red, yellow, and white onions. Flavors can be sweet and juicy to sharp, spicy, and pungent, often depending on the season in which they are grown and consumed.


    It is estimated that 105 billion pounds of onions are harvested each year, worldwide. According to the Food and Agriculture Organization of the United Nations (FAO), China is the biggest producer.


    The possible health benefits of consuming onions include lowering the risk of several types of cancer, improving mood, and maintaining the health of skin and hair.


    Germination of Onion Seeds:


    Producers need to know whether the germination rate will produce sufficient numbers of seedlings needed for field production of onion. The influence of temperature (5.0, 7.5, 10, 15, 20, 25, 30, 35, or 40°C) and continuous light or continuous dark was tested for effects on percentage germination of normal, abnormal, or diseased seed; production of normal seedlings; and percentage of ingeminated solid and soft seeds of onion.

    Tips for Growing Onions from Seed:

    1. Start with fresh seed and seed starting mix

    2. Provide bottom heat

    3. Clip off seed husks

    4. Keep under lights and trim back

    5. Transplant when the third leaf appears

    6. Trim off seeding leaves

    7. Provide maximum light
    8. Harden off, but protect from chilling
    9. Band composted fertilizer in the planting trench
    10. Sow leafy greens between rows to suppress weeds


    Benefits


    Onions have been praised for their flavour and health benefits for thousands of years.


    Plant foods also promote a healthful complexion, hair, increased energy, and overall lower weight.
    Cancer

    Allium vegetables have been studied extensively in relation to cancer, especially stomach and colorectal cancers. Their beneficial and preventive effects are likely due in part to their rich organosulfur compounds.

    Onions are also a source of the strong antioxidant vitamin C that helps to combat the formation of free radicals known to cause cancer.

    Colon cancer

    High fibre intake from all fruits and vegetables are associated with a lowered risk of collector cancer. One study showed that consuming greater than 7 servings of onions per week was associated with a decrease in collector cancer.

    Prostate cancer
    In a paper, published by the Journal of the National Cancer Institute, researchers used a population-based, case-controlled study to investigate the relationship between alliums vegetable intake and prostate cancer. They found that men with the highest intake of alliums vegetables had the lowest risk of prostate cancer.

    Esophageal and stomach cancer

    Frequent intake of alluviums vegetables has been shown to reduce the risk of esophageal and stomach cancer. Several survey-based human studies have demonstrated the potential protective effects of consuming alliums, as well as reports of tumour inhibition of alluviums compounds in animal experiments.

    Sleep and mood

    Foliage, found in onions, might help reduce depression. Homo cysteine prevents blood and other nutrients from reaching the brain, and foliage prevents this chemical from building up.

    Skin and hair

    Onions are high in vitamin C, which is needed for the building and maintenance of collagen, which provides structure to skin and hair.


    Nutrition

    Onions are a nutrient-dense food, meaning that while they are low in calories, they are high in beneficial nutrients like vitamins, minerals, and antioxidants.

    One cup of chopped onion contains approximately 64 calories, 15 grams of carbohydrate, 0 grams of fat, 0 grams of cholesterol, 3 grams of fiber, 7 grams of sugar, 2 grams of protein, and 10 percent or more of the daily value for vitamin C, vitamin B-6, and manganese.

    Onions also contain small amounts of calcium, iron, foliage, magnesium, phosphorus, and potassium, and the antioxidants Quentin and sulphur.

    Risks

    The risks of onion consumption are minimal. However, as with all food that may otherwise be healthful, over consumption comes with potential health risks. Allergy sufferers may have a problem consuming onions, too.

    It is the total diet or overall eating pattern that is most important in disease prevention and achieving good health. It is best to eat a diet with variety than to concentrate on individual foods as the key to good health.


    Wednesday, 15 April 2015

    Brinjal Germination Plantation & Health Benefits


    Brinjal is one among the most beautiful vegetables, and also very tasty dishes can be prepared.Growing brinjal require the seeds to germinate first in a different tray.

    GERMINATION

    Step 1:
    Fill a pot with water that equals five times the seed volume and brings it to a boil on a stove. Check the temperature of the water with a cooking thermometer, and when it reaches 176 degrees Fahrenheit, remove the pot from the stove.

    Step 2:
    Place the monkey pod tree seeds in the hot water and stir them for up to two minutes with a spoon before draining the liquid.

    Step 3:
    Fill a bowl with lukewarm water that's between 86 and 104 degrees Fahrenheit and soak the seeds in it for 24 hours. This pre-treatment is called scarification and alters the hard seed coat, which increases the chances of uniform germination.

    Step 4:
    Fill a pot with the moist seed-starting mix up to 1 inch from the top, place the seed on top of the surface and cover it with a 1/2-inch layer of the mix. Tamp down lightly and moisten the surface with a water-filled spray bottle to avoid washing away the seed.

    Step 5:
    Cover tightly plastic polythene wrap over the pot to promote soil moisture retention and place it in a dimly lit area of the house. Lift the plastic daily to check that the soil is moist. If not, lightly moisten it with a water-filled spray bottle before replacing the plastic. Expect germination within three to five days.

    Step 6:
    Remove the plastic as soon as the seedlings emerge, and gradually move the pot to a brighter area over a two-week period so that at the end of that time they're acclimated to being in full sunlight.

    Step 7:
    Transplant the seedlings outside to an area with full sun and well-draining soil after three to five months, when the seedlings are about 8 to 12 inches tall.            


    To grow brinjal in a plastic sack, it takes 40 days to grow brinjal at this height.
    Support for brinjal may require as the fruit is little heavy, so plan for the support prior to transplanting to a bigger container.
        
    Usage of fertilizer and other pesticides can be avoided to produce organic fruit. Soil preparation prior to planting is very important.              


    Soil preparation is done while using cow dung or vegetable wastes. Kitchen wastes can be separated from plastic papers and other non-degradable wastes. these can be mixed with soil and can be prepared for producing manure. Same is being used here instead of fertilizers.
    This gives more excitement when it fruits, I believe everyone would enjoy this result after a little effort and care that we can give.