Wednesday, 11 January 2017

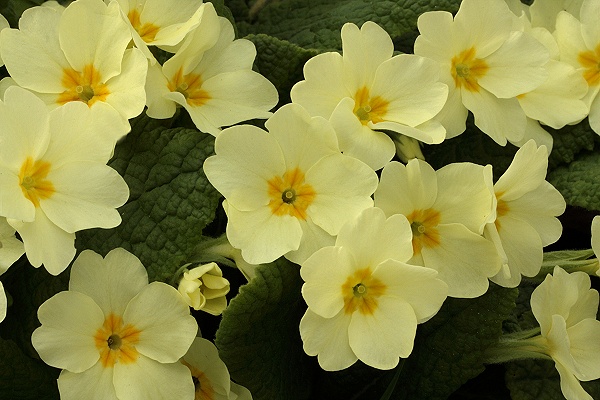
Primrose flower seed germination


Primrose is a biennial plant grows in America.It can be started from seed.It has a benefit, it can be sowed directly in the soil.Frost is harmful to this plant or seed.It is a fragrant flower plant.

SPECIFICATION OF PRIMROSE

Height :36-60" tall
Sunlight: full sun
Soil: Sandy Soil, Loamy Soil
Zone:7, 8, 9
Flower colour: mixed
Life cycle: biennials
Bloom time: summer
Water: average
Spacing: 18 to 24"

GERMINATION GUIDE
Most important: Avoid Rainy day or a cloudy weather for sowing the seeds.
You will definitely get nothing unless you wait for the bright sunny day and clear weather.

Primrose is very easy to grow. Sow the seed direct to the soil or can use a big a ready pot for til to flowering.

Use a flat seedling tray and its deep will be 10 centimetres, and fill seedling media to within 3/4  of the rim with a sterile potting soil or sieved vermiculite as a professional media . Fill the tray with diluted fungicide water (2gm in 1-litre water). Make sure you have plenty of holes in it for good water drainage. And  Allow the soil in the flat to absorb the water through the bottom drainage holes until the soil surface becomes moist.


Sow seeds after soaking the seeds overnight on the soil surface apart 2 in. Since the seeds were tiny, need to cover with sieved vermiculite dust for a  light covering. This way the seeds will hide . Do not put the seed deep inside so be  careful about putting the seed because seeds will not go deep into the mixture.

Moist again with diluted fungicide water ensure the soil surface it's evenly moist. Ideal germination temperature is between 12 and 15 degrees Centigrade. Lower temperatures do no harm, but anything over 18 Centigrade is fatal.


 Inspect regularly and water as necessary. Do not allow the compost to dry out.The Primula usually sprout within 15  to 20 days.As soon as the seeds sprout remove the cover. Protect against slugs. Polyanthus and primrose sprout within three weeks. Few species are slower and may take six weeks. Most of the species need natural freezing and thawing to get them started so it's important to sow as early as possible.

Use a dilute fungicide water for this sprinkling as a prophylactic against damping off.
Gradually move the pot to a brighter area with six to eight hours of daily sunlight for a two-week period so that at the end of that time they're acclimated to being in full sunlight. Water the seedlings when the soil surface feels dry.


Transplant the Primula outdoors or in a new pot when they at least four leaves. Plant at them 8 to 14 inches apart on the ready ground with same depth were they growing at previously. Primulas establish much faster if a good root system has developed before they are moved. Wait until you have at least four leaves before you pick out.

Sow Outdoors: Surface. Following the last frost. Spacing 4 to 24 inches (10 to 60 cm).

Sow Indoors: Mix seeds in a growing medium, place in a freezer bag, keep moist, then stratify by refrigeration for two to three weeks. Use peat pots. Germination time: one to three weeks in the light. Temperature 75°F (24°C). Seven or eight weeks in advance. Transplant outdoors in the last month of spring.

BENEFITS OF PRIMROSE

1. Primrose contains much of fatty acid.

2.Primrose oil is helpful to heart.

3.Primrose oil is used to reduce hair-fall.


Lobelia flower seed germination


Lobelia is an annual plant.It is mostly used as medicinal plant.It is known as Indian tobacco.

Most important: Avoid  Rainy day or a cloudy weather.
You will definitely get nothing, wait for the bright sunny day and clear weather.


SPECIFICATION OF LOBELIA


Scientific Name: Lobelia inflata

Uses: beds, borders, containers and colour bowls

Exposure: Partial shade

Garden height:5″ / 12 cm

Crop time:9-11 weeks

Common Name-Cardinal Flower

Botanical Name - Lobelia fulgens

Zones - 3 - 9
Light requirement - half sun/ half shade /full shade

GERMINATION


Most important: Avoid Rainy day or a cloudy weather for sowing the seeds.
You will definitely get nothing unless you wait for the bright sunny day and clear weather.


GERMINATION GUIDE

Use a flat seedling tray and its deep will be 10 centimetres, and fill seedling mediator within 3/4  of the rim with a sterile potting soil or sieved vermicompost. Fill the tray with diluted fungicide water (2gm in 1-litre water). Make sure you have plenty of holes in it for good water drainage. And  Allow the soil in the flat to absorb the water through the bottom drainage holes until the soil surface becomes moist.


After soak moist the seedling tray sow the seeds on the soil surface. Do not cover the dust-like seeds.  Provide bright light and a soil temperature of 18-25°C (65-75°F). Germination takes 15-21 days. Water with a mist sprayer
Use spray for moist again with diluted fungicide water ensure the soil surface it's evenly moist.
 Cover tightly plastic polythene wrap over the pot to promote soil moisture retention and place it in a 60 to 70 degree Fahrenheit location or in an artificial area of the house that receives indirect light to germinate. Lift the plastic after two days  to check that the soil is moist or not. If not, lightly moisten it with a water-filled spray bottle before replacing the plastic.

 The Lobelia usually sprout within seven to 10 days.Remove the plastic as soon as the seedlings emerge, and gradually move the pot to a brighter area with six to eight hours of daily sunlight for a two-week period so that at the end of that time they're acclimated to being in full sunlight. Water the seedlings when the soil surface feels dry.


Transplant the lobelia outdoors or in a new pot when they are four leaves. Plant at them 8 to 14 inches apart on the ready ground with same depth were they growing at previously.

Cali Flower Germination


The Cauliflower is a challenging member of the cabbage family to grow. To grow first use water and feeding is the main secret for the young plants. Cauliflower prefers the cool season.

You will definitely get nothing unless you wait for the bright sunny day and clear weather.

GERMINATION GUIDE

Use a flat seedling tray and its deep will be 10 centimetres, and fill seedling media within 3/4  of the rim with a sterile potting soil or sieved vermiculite. Fill the tray with diluted fungicide water (2gm in 1-litre water). Make sure you have plenty of holes in it for good water drainage. And  Allow the soil in the flat to absorb the water through the bottom drainage holes until the soil surface becomes moist.


Sow seeds on the soil surface apart 2 in. Press on the seeds lightly with your fingers so they are in full contact with the soil, but don't cover them with soil because they require light to germinate.Cauliflower needs the cool-weather starting seeds indoors 4 weeks before your last frost date. Cauliflower need plenty of light as seedlings to prevent them from growing spindly

Variety is important. Many cauliflower varieties have long curled leaves that grow close to the head providing adequate shade. A large white cauliflower with tight white curds is the beauty of producing for much satisfaction.To maintain the pure white colour Cauliflower heads make a shad to protect from the sun.


Transplant Quick the Cali flower plant  outdoors or in a new pot when they are about 4 weeks old and about 4 to 6 inches tall with minimum root disturbance. It will be  better to transplant at evening.To ensure to get good contact with the soil you need to push the soil in around the roots firmly with your fingers.  Plant at them 18 to 24 inches apart on the ready ground with Uniformly. Cauliflower plants should be planted 24 inches between plants and 24 inches between rows.  The size of the head depends the distance so try to stick to the recommended distance. The closer you plant, the smaller the head.

Cauliflower Health Benefits
1.Cauliflower is low in fat, low in carbohydrates but high in dietary fibre, Folate, water and vitamin C, bringing about a high nutritional density.

2.Cauliflower contains Sulfonamides which is a sulphur compound that is known for killing cancerous cells


3.Cauliflower is rich in vitamins and minerals such as vitamin C, Vitamin K, protein, Thiamin, riboflavin, niacin, magnesium, phosphorous, fibre, Vitamin B6, Folate, Pantothenic acid, and manganese


4.Cauliflower is a great source of Colline which increases the development of the brain.


Diseases:
Cauliflower is susceptible to the same pests and diseases as other members of the cabbage family. To reduce the risks, avoid planting cabbage relatives in the same spot 2 years in a row.

Wednesday, 4 January 2017

Brocccoli seeds germination


Broccoli is one of the vegetables of cabbage family.It is not only a vegetable it also contains many vitamins like Vitamin A, Vitamin C and also regards for cancer-fighting food.It contains antioxidants which help the body to fight disease.

SPECIFICATIONS OF BROCCOLI

pH range :6.0 - 6.8
Light : Full Sun
Soil type: light, dry, well-drained soil
Life cycle: Annual
Zones : 3 to 10

GERMINATION OF BROCCOLI


Most important: Avoid Rainy day or a cloudy weather for sowing the seeds.
You will definitely get nothing unless you wait for the bright sunny day and clear weather.


GERMINATION GUIDE

Use a flat seedling tray and its deep will be 10 centimetres, and fill seedling mediator within 3/4  of the rim with a sterile potting soil or sieved vermicompost. Fill the tray with diluted fungicide water (2gm in 1 litre water). Make sure you have plenty of holes in it for good water drainage. And  Allow the soil in the flat to absorb the water through the bottom drainage holes until the soil surface becomes moist.

 Sow seeds indoors 6 to 8 weeks before average last spring frost. Keep soil warm (about 75 F), until germination. Then keep plants around 60 F. Provide direct sun so plants don’t get leggy.

Can sow directly on the ready  soil as soon as you can work the soil. Will germinate at soil temps as low as 40 F. Plant ½ to ¾ inch deep, about 3 inches apart. Thin to final spacing by plucking few plants from the bed.

Broccoli grows best in full sun and where the soil is slightly acidic—with pH between 6.0 and 6.8—fertile, and well-drained, yet consistently moist and rich in organic matter. The right pH and the organic matter help ensure that nutrients, particularly essential micronutrients like boron, are readily available.


The Broccoli usually sprout within seven to 10 days.Transplant when plants have four or five true leaves about 4 to 6 inches tall. Plant at them 15 to 17 inches apart on the ready ground with same depth were they growing at previously. When planted in the garden as a seedling plant Broccoli grows well. For gardening in rows, set the transplants 18 to 24 inches apart within the row and space the rows 24 to 36 inches apart. Be sure to set transplants slightly deeper in the ground than they were in the pot.Water the seedlings when the soil surface feels dry.

Use low nitrogen fertilizer at planting but too much nitrogen fertilizer may cause hollow stems. As Broccoli is a  heavy feeder, so work in two to four inches of rich compost before planting.
Plants have shallow root systems. Avoid even shallow cultivation. Mulch to protect roots, reduce weed competition and conserve moisture.Use floating row covers to help protect from early insect infestations.

Row covers may be used on small plantings to help protect plants from early damage and this protection from pest insects, but the best protection is to grow healthy plants. A hard stream of water can be used to remove aphids from plants. Wash off with water occasionally as needed early in the day.Putting a hot cap on the plants gives them a good start in the spring and will protect them from a hard freeze.Once the plants get well rooted, they grow fast in the cool spring temperatures.


 BENEFITS OF BROCCOLI

1. Broccoli helps to reduce cholesterol.
2.Broccoli works as anti-cancer in our body.
3.It contains high-level calcium which is very helpful for bone problems.


Golden shower tree seeds


Golden shower is a perennial ornamental plant.It is known for its climbing habit.It is bloomed mainly in early summer.Partial shade is good for it.Its flower are attractive to bees, butterflies and birds for sweet fragrant.

SPECIFICATION OF GOLDEN SHOWER

Light requirement :full sun
Bloom time :Late spring to early summer
Flower color :yellow
USDA zone :4 to 9
soil type :Sandy Soil, Loamy Soil, Clay Soil
Life cycle :perennial
Height :30-40 ft. (9-12 m)over 40 ft. (12 m)

HOW TO GERMINATE GOLDEN SHOWER 

Use a flat  seedling tray on which deep will be 1 inches deep. Make sure you have plenty of holes in it for good water drainage. Take equal quantity of sand, soil and vermicompost. Then we will mix all three meterial into one container. Thereafter we will spreed our seeds on the mixture.

Step 1
  Use a flat seedling tray and its  deep will be 5 centimeter. Make sure you have plenty of holes in it for good water drainage.

Step 2
 As the seeds are  perfect in size then you can put the seeds over it by 1/3 after that cover the seeds with seedling mix only about 1 cm (one centimeter)


Step 3
 Take equal quantity of sand, soil and vermicompost. Then  mix all the three ingredients into one container.

Step 4
  Sprinkle diluted fungicide water (2gm in 1 liter water) after sowing the seeds.We have to careful about putting the seed because seeds will not to go deep inside the mixture.


 Step 5
 Thereafter  spreed the golden shower seeds on the mixture. If your seeds are so tiny then you can spreed water very lightly and carefully on the seed.Make sure that the water must be mixed with diluted fungicide powder.It is very important  notice to follow that the seeds will not to go very deep inside the mixture by speeding water on the seed, if it happen then the fertilization of the seeds are become difficult.


Step 6
 Cover tightly  plastic polythene wrap over the pot to promote soil moisture retention and place it in a dimly lit area of the house. Lift the plastic daily to check that the soil is moist. If not, lightly moisten it with a water-filled spray bottle before replacing the plastic. Expect germination within three to five days.

Step 7
Remove the plastic as soon as the seedlings emerge, and gradually move the pot to a brighter area over a two-week period so that at the end of that time they're acclimated to being in full sunlight. 

Step 6
Minimum  warm, above 60ºF (15.5ºC),is needed inside the container and it should be placed in sunny area.After that the whole thing should be covered with a poly bag and after 21 days later the plastic can be removed.

Step 7

Watering it regularly ;do not overwater. place the container in semi shaded place. Golden shower  needs a proper sunny area to germinate it.

Step 8

After 21 days it will raise many small leaf.Then dig the soil where the  plant will take proper sun and put the plant into it.

USES OF GOLDEN SHOWER

It is used for many skin problems.


Tuesday, 3 January 2017

Goji berry fruit plant germination


Goji berry plant is a Himalayan plant which produces antioxidants, proteins, amino acid and essential minerals.It is a perennial plant and it has many medicinal uses in ancient China.Its germination is good in winter.It is used to cure eye, liver and kidney ailments.

SPECIFICATION OF GOJI BERRY

Plant size :60-84" tall, 60-84" wide
Light: Full Sun
Fruit colour: red
Bloom time: Harvest early summer to frost
Soil type: Sandy Soil, Loamy Soil, Clay Soil
Zone: 5 to 8


GERMINATION GUIDE
Most important: Avoid Rainy day or a cloudy weather for sowing the seeds.
You will definitely get nothing, wait for the bright sunny day and clear weather.
 Growing Methods in seedling tray

Goji berry plants can thrive in containers or a garden in the ground. Container plants do not grow as large, but growing several plants can make up for the loss in yield. They are also an ideal option for gardeners with limited growing space.

Container Planting

Soak the seeds with warm (70 to 80 degrees Fahrenheit )  water that is from for one to two days.Or
Start by soaking the seeds in water for two to three days. This will increase their rate of germination. Better to place the seeds direct sunlight . Mixed with sand with the commercial potting mix(Vermicompost) or garden soil and sieved with strainer  until it is very fine.Goji berry plants grow well in a mixture of potting soil and organic matter. If the soil does not drain well, add vermiculite or perlite to it. Proper drainage is important for root health. Instead of using fertilizer to add nutrients, frequently add a layer of compost. Organic matter contains all nutrients a goji plant needs.

Because a good growing medium for developing seedlings consists of sand and potting mix. Mix the two together until fine consistency results. The ideal pH range for soil is between 7 and 8. Place the mix in a seedling tray, and bury each seed about 1/4-inch deep. The seeds need full sun and water mist to keep the soil moist.

 The ideal soil pH should be between 7 and 8.

Sow the seeds 1/4 to 1/2 inch deep indoors in pots if you live in a colder area. Move the pots outside when the weather begins to warm. If you live in a warmer area, plant them outdoors in the partial sun after the danger of frost has passed.

Sprinkle diluted fungicide water (2gm in 1-litre water) after sowing the seeds. The temperature should be from 64 to 68 degrees Fahrenheit. Spray the seedlings with a mist sprayer until two leaves appear. Irrigate them with a sprinkler after that if your seedlings are outside. Do not allow the soil to become soggy.

 Ground Planting

Snip off the main stem just above the third leaf when it appears. This will cause the plant to grow laterally as a bush rather than vertically as a tree. A bushy form will yield more berries than a taller plant.Transplant the seedlings to a container or the ground when they reach about 5 inches in height.Space the goji seedlings about 4 feet apart in the ground. This allows the bush to spread without running into the neighbouring plant. Place the seedling in a hole about the size of the root ball.

Care

Goji berry plants require special care to thrive in containers or in the ground. Gardeners need to know how much sun and water the plants need and what type of soil provides the best growing environment. Pruning is also an important part of goji plant care.
Soil


Water

Need daily water for goji plants during dry or drought conditions. Controlled water when the soil is not dry or is located in a humid climate. Overwatering can damage the root rot for fungal growth. Water in the early morning. Drooping leaves are a sign that the plant is not receiving enough moisture.


USES OF GOJI BERRY

1. Goji berries are a good source of minerals, vitamins (vitamin a, vitamin c, iron, fibre)

2.It is also used for antibacterial and anti-fungal.

3.It increases a lot of energy levels and it is anti- ageing.

4.It is good for cure eyesight problems.


Monday, 2 January 2017

Four o' clock seed germination


Four o' clock is a mixed flower. It is an annual plant.It like lots of sunlight. It is bloomed between four to eight pm o' clock. It has sweet fragrant.

SPECIFICATION OF FOUR O' CLOCK

Lifecycle: Perennial
Light requirement: Full Sun
Hardiness zones 8 to 11
Soil type: Clay Soil, Sandy Soil, Loamy Soil, Drought/Dry Soil, Moist/Wet Soil
Mature height:12-36 inches tall
Bloom time: Spring to summer flower colour: mixed
Days of germination: 10 to 15

GERMINATION GUIDE


Outdoor


Loosen the soil to a depth of 6 to 8 inches using a shovel or fork, and mix in some compost to improve the soil structure and drainage. Fertilize with a slow-release fertilizer. Rake the soil smooth, removing any large clumps and rocks.

Sow Four o’clock seeds directly in the garden in spring or early summer, about 4-6 inches apart; cover seeds lightly with soil and press gently.

Keep the soil moderately moist in the top 1 to 2 inches while the four o'clock seeds germinate. Watch for the first sprouts in seven to 10 days if daytime temperatures stay reliably above 70 degrees.

Once seedlings are a few inches tall, remove extra plants so the remaining ones are at least 1 foot apart. Pull weeds that sprout nearby, and apply organic mulch, such as bark chips, to control weeds and conserve soil moisture. Water regularly during the period of summer drought.

Remove any weeds from the planting site, as well as rocks, sticks and other debris that may inhibit drainage. Till or turn over the top 10 inches of soil. Spray the bed with water to settle the soil.

Indoor:
Use a flat seedling tray .and its deep ill is 1.5 to 2 inches deep. Make sure you have plenty of holes in it for good water drainage. Take equal quantity of sand, soil and vermicompost. Then mix all three material into one container. Thereafter spread seeds in the mixture.

As the seeds are so small that's why to spread water very lightly and carefully on the seed.Make sure that the water must be mixed with diluted fungicide powder.It is very important to notice to follow that the seeds will not to go very deep into the mixture by spraying water on the seed.

Need temperature minimum warm, above 60ºF (15.5ºC), is needed inside the container and it should be placed in the sunny area.After that, the whole thing should be covered with a poly bag and after 7 to 15 days later the plastic can be removed.

Watch for the first sprouts in seven to 10 days. Remove the grow lamp and turn off the heating coil once the four o'clock seedlings produce a pair of mature leaves. Continue to water when the potting mix dries out on the surface.

Transplant the plant for permanent pot or  on the ground. Choose a sunny site with moist, neutral soil. Space them 2 to 3 feet apart and spread a 2-inch layer of mulch between them to protect the roots.
Four o’clock flowers grow and bloom abundantly in the summer garden. Blooms open in the late afternoon and evening, hence the common name four o'clock. Highly fragrant, in a range of colours,

Read more about Gardening Know How: Tips And Information About Growing Four O’clock Plants https://www.gardeningknowhow.com/ornamental/flowers/four-oclocks/four-oclock-plants.htm
Four o’clock flowers grow and bloom abundantly in the summer garden. Blooms open in the late afternoon and evening, hence the common name four o'clock. Highly fragrant, in a range of colours,

Read more about Gardening Know How: Tips And Information About Growing Four O’clock Plants https://www.gardeningknowhow.com/ornamental/flowers/four-oclocks/four-oclock-plants.htm


Four o'clock begin flowering in mid- to late summer and continue into fall.
USES OF FOUR O' CLOCK PLANT: Its root is used for medicinal purpose.


Watermelon seed germination


Watermelon is one of those fruits which takes lots of light, lots of water, lots of nutrients.It is a climbing plant and its leaf is long crinkled by look.

SPECIFICATION OF WATERMELON

Planting depth: 1inches

Planting space: 6 - 8 seeds per hill
Germination days: 7 - 14
Plant type: loamy, fertile and well-drained soil

Sow Outdoors: Surface. Following the last frost. Spacing 4 to 24 inches (10 to 60 cm).

Sow Indoors: Mix seeds in a growing medium, place in a freezer bag, keep moist, then stratify by refrigeration for two to three weeks. Use peat pots. Germination time: one to two weeks in the light. Temperature 75°F (24°C). Transplant outdoors in the last month of spring.

HOW TO GERMINATE WATERMELON SEEDS

Soaking the seeds before planting increases the risks of various fungal diseases, such as anthracnose caused by the Colletotrichum lagenarium fungus. So don't  soak the seeds before germination.We know many types of plant seeds benefit from pre-planting soaking to soften the outer seed coating and hasten germination.we don't do that for watermelon.
Watermelon seeds need warm weather for germinating. It takes approximately three days for a watermelon seed to germinate in 90 degrees Fahrenheit conditions, and approximately 10 days when temperatures are at 70 degrees.

Put the watermelon seeds in peat pots indoors approximately three to four weeks before the last frost date in your region. Once all risks of frost have passed, you can transplant the watermelon seedlings into the ground.These plants are very frost sensitive can quickly kill them to avoid the cold time.

Use a flat tray container about 10 inches by 15 inches (biggest or smaller your choice) 1.5 to 2 inches deep. Make sure you have plenty of holes in it for good water drainage.Take equal quantity of sand, soil and vermicompost. Put the seedling mix you prepared up to almost top leaving about 0.5 inches space. If the seeds are perfect in size then we can put the seeds over it by 1/3. After that cover, the seeds with seedling mix only about 0.5 cm (half a centimetre) .water it by watering can. place the container in a semi shaded place. Sprinkle diluted fungicide water (2gm in 1-litre water) after sowing the seeds.We have to care about putting the seed because seeds will not go deep into the mixture.

 Sprinkle diluted fungicide water (2gm in 1-litre water) after sowing the seeds.We have to care about putting the seed because seeds will not go deep into the mixture. For growing the seeds outdoors, try to laying black plastic mulch over the planting site to help absorb the sun's heat and increase soil temperatures during the day, and in turn, speed up watermelon germination.

For the best results with watermelons, use 3 pounds of 5-10-10 fertilizer for every 100 square feet of planting space.


BENEFITS OF WATERMELON: Watermelon is a very common fruit and it has many uses in the market.Its oil, juice, seeds and many things are useful to us.

1. Fatty acid and many essential proteins and minerals are packed with watermelon seeds.It also contain calories, it provides 600 calories around 100gm watermelon seeds.

 2.Watermelon is important for low cholesterol and low fat.

3.Watermelon contains Vitamin B which helps to keep a lot of energy.

4.Watermelon also work for antioxidants which helps to protect from kidney stone, cancer and cardiac ailment


Lawn grass seed germination


What Grass is that? – is a question asked by many homeowners and inexperienced lawn mowing contractors. There are many different grass types which fall into one of the two categories of grasses: Warm or Cool Season Grasses.

There are many different ways to grow Lawn grass from seed.It takes 7 to 21 days to germinate. It is a perennial category.


SPECIFICATION OF LAN GRASS

Lifecycle: perennial

Light requirement: half sun/ full sun

Grass type: Hot season and  cold season

GERMINATION GUIDE


Use a flat seedling tray and its deep ill be 1.5 to 2 inches deep. Make sure you have plenty of holes in it for good water drainage. Take equal quantity of sand, soil and vermicompost. Then we will mix all three material into one container. Thereafter we will spread our seeds on the mixture. As we know very well that our seeds are so small that's why we can spread water very lightly and carefully on the seed.Make sure that the water must be mixed with diluted fungicide powder.It is very important to notice to follow that the seeds will not to go very deep into the mixture by spree ding. water on the seed, if it happens then the fertilization of the seeds become difficult.Minimum warm, above 60ºF (15.5ºC), is needed inside the container and it should be placed in the sunny area.After that, the whole thing should be covered with a poly bag and after 21 days later the plastic can be removed.


Step 1

Use a flat seedling tray and its deep will be 5 centimetres. Make sure you have plenty of holes in it for good water drainage.

Step 2

If the seeds are perfect in size then you can put the seeds over it by 1/3 after that cover the seeds with seedling mix only about 1 cm (one centimetre).

Step 3

Take equal quantity of sand, soil and vermicompost. Then mix all the three ingredients into one container.

Step 4

Sprinkle diluted fungicide water (2gm in 1-litre water) after sowing the seeds.We have to care about putting the seed because seeds will not go deep into the mixture.

Step 5

Thereafter spread the lawn grass seeds on the mixture. If your seeds are so tiny then you can spread water very lightly and carefully on the seed.Make sure that the water must be mixed with diluted fungicide powder.It is very important to notice to follow that the seeds will not to go very deep inside the mixture by speeding water on the seed if it happens then the fertilization of the seeds become difficult.

Step 6

Cover tightly plastic polythene wrap over the pot to promote soil moisture retention and place it in a dimly light area of the house. Lift the plastic daily to check that the soil is moist. If not, lightly moisten it with a water-filled spray bottle before replacing the plastic. Expect germination within three to five days.


Step 7

Remove the plastic as soon as the seedlings emerge, and gradually move the pot to a brighter area over a two-week period so that at the end of that time they're acclimated to being in full sunlight.


Step 8

Minimum warm, above 60ºF (15.5ºC), is needed inside the container and it should be placed in the sunny area.After that, the whole thing should be covered with a poly bag and after 21 days later the plastic can be removed.

Step 9
Watering it by daily. place the container in a semi shaded place.


Tuesday, 27 December 2016

Phlox flower : Description and Germination

                                              Phlox
Phlox are a fragrant summer wildflower that complement any garden.It is the tall, eye-catching perennials are ideal for sunny borders. Phlox flower is available as both annuals and perennials.But it is quite old fashioned annual.It is a lovely flower in color and deserves more then it gets.This is in shade of pink, purple, lavender or white flowers bloom for several weeks in summer, and make excellent cut flowers. Growing hardy garden phlox is simple and is general care.Phlox is a excellent choice to learn how to grow from seed.

Botanical Name: Phlox

Family: Polemoniaceae

Life cycle : Annual & Perennial

Flower color : Mixed

Mature height :8-20"

Bloom time : Early summer

Soil type : Sandy Soil, Loamy Soil, Drought/Dry Soil

Light requirement : Full sun

GERMINATION
  • Mix one part per lite, one part sand and one part potting soil in a 5-gallon bucket. Add water slowly to the mixture until it is evenly moist but not soggy. Fill a plastic seedling tray with soil.
  • Spread the Phlox seed horizontally over the surface of the media in the tray. Space the individual seeds 2 to 3 inches apart. Press the seeds down gently to ensure full contact with the soil's surface.
  • Put on a pair of gloves. Read all label directions and warnings on a package of seedling fungicide. Dust the fungicide onto the surfaces of the seeds with a small paintbrush.
  • Sprinkle a 1/4- to 1/2-inch layer of soil over the top of the seeds, covering them completely. Lightly mist the soil's surface with water from a spray bottle. Cover the tray with a clear plastic cover.
  • Position a heat mat in an area with bright, indirect sunlight and a constant temperature of 75 to 80 degrees Fahrenheit. Turn the mat on and adjust its temperature setting to 85 degrees Fahrenheit. Place the tray on top of the mat.
  • Remove the cover once per day, and wipe away any condensation from its interior with a paper towel or cloth. Lightly mist over the tray when the top layer of soil begins to dry. Keep the media moist, but never soggy.
  • Watch for emerging sprouts one week after planting. Remove the cover once the seeds germinate. Remove the tray from the mat, put the mat away and replace the tray in its former position.
  • Water the seedlings in the morning with a watering can when the top 1 inch of soil becomes dry. Pour the water directly onto the growing media, being careful not to splash the leaves.
  • Fertilize the seedlings weekly with a 10-10-10 water-soluble fertilizer. Mix 1/2 teaspoon fertilizer with 1 gallon of water. Pour the fertilizer solution directly into the tray, applying it in place of a watering.

Thursday, 22 December 2016

A to Z germination tips.

Different Germination Tips & Articles


Universal-Germination-Guide:


Aster germination tips

Angle Marmelos Secred Bael


Aglaonema ornamental plant

Annual Sweet Pea

Annual Sweet Pea

Annual,Perennial & Bennial

Arjun seed germination

Avocado fruit


American maritima flower seed 

Apple kul germination

Azaleas flower seed germination

Adenium Germination guide step by step

Basil seed germination tips

Benefits of Lady's Finger


Benefits of Pomelo

Bells verbena flower seed

Balsam flower seed germination


Balloon flower seed 

Blue Butterfly pea


Beans germination


Brinjal plantation

Blueberry germination

Blueberry germination

Blood Red Crape Myrtle

Blue Jacaranda

Begonia flower seed

Bottle Guard


Bottle gourd


Brownea flower seed germination

Butterfly pea seed

Cactus care


Camellia flower seed germinatiom

Cactus Germinattion


Canterbury bells seed germination

Cactus varities


Capsicum fruit seed

Cauliflower 

Cactus Mammillaria

Climbing Strawberry

Climbing Strawberry

Custard Apple

Coconut seed germination


Collincia  flower seed germination

Cucumber Germination

Clarkia Amoena

Celocia flower seed germination


Coromcha fruit plant

Cochia Burning Grass seed germination


Coriander seed

Clitoria Ternatea, White Butterfly Pea


Chrysanthemum/ Garden mums flower seed 

Cycas seed germination

Daisy flower seed germination

DESERT ROSE

Dragon Fruits


Drumstick fruit  seed

Dragon seed germination tips

Difference between Annual, Perennial, Biennial

English Lavender Vera


English Daisy flower seed

Fig seed germination

Foxtail palm germination tips


Four o' clock flower seed germination 

Forget me not flower seed germinatin

Guava germination tips

Gomphrena Globe


Golden shower tree seeds 

Gladiolus flower seed

Godetia grandiflora flower seed 

Goji berry seed germination

Gandergoose seed germination

Garden Cona Coffee Been 


Green beans

How to germinate papaya


How to peal a pomelo

Hibiscus flower seed

How to care your Rose Care

How to germinate Adenium Obesum Desert Rose


Kohlrabi vegetable


Incarvillea germination tips


Lawn grass seed germination 

Lemon balm germination tips 


Lobelia flower seed germination 

Lobularia flower seed 

Lithops Cactus

Live Gardenia flower seed 


Lychee or Litchi flower seed germination

Moss Verbena

Mammoth Long Island Dill

Malabar spinach

Magnolia flower seed germination 


Mexican Zinnia flower seed

Mimosa Pudica flower seed germination

Morning glory flower seed germination 


Miniature rose 

Nasturium flower seed

Neem seed germination tips 


Nemesia flower seed

Night Jasmine flower seed 

Nicotina flower plant 

Nigella flower plant
 
Ornamental Tree seeds


Onion seed 

Orchid flower seed germination

Pink climbing Rose

Plumeria

Passion Fruit 


Peony flower seed

Plumeria flower seed


Plant rust and dieasese

Purple Rose of Sharon

Purple climbing Rose seed germination 


Primrose flower seed

Pomelo seed germination tips

Papaya seed germination

Peaches

Pomegranate fruit germination 


Pomegranate fruit plant 

Pindo palm ornamental tree

Portulaca flower seed germination

Phlox flower seed germination

Rose

Redwood Bonsai tree

Red Climbing Rose


Red pansy seed 

Red chili seed

Redwood Bonsai, World's Biggest tree

Royal Poulownia Emprees Tree

Rooting Hormone step by step guide

Royal Poinciana Ornamental Gulmohor


Rudraksha fruit plant

Star Fruit

Sesbania-grandiflora


Spider flower seed germination

Sweet William (Dianthus Plant)

Soil Treatment

Sweet Corn seed germination

Sandalwood seed germination tips

Salvia flower seed germination

Samena Saman Greenfield Rain Tree

Sacred lotus ,Nelumbo Seed- Nucifera , Indian National Flower


Snapdragon flower seed germination 

Snowball flower seed 

Snake gourd

Siberian pea seed germination

Strawflower seed 

 Sunflower seed germination

Tasso strawberry

Tea (Camellia sinensis)

Tomato seed germination

Tamarind seed germination tips

Tithonia flower seed germination

Thyme seed germination

Thi Chikoo fruit


Thanbergia folwer seed 

Tuberose flower seed

True english lavender vera(Herb)

Tea Camellia Sinensis

True English Lavender Vera


Umbrella palm seed 

Vegetable Seeds indoors

Vegetable gardening

Veined Vervain Moujean Tea Flower 


Viper's Bagloss flower seed

White & Hot Pink Rose


Watermelon fruit seed germination

Wild flower

Wheat grass germination


White butterfly bush seed 

White pansy flower seed

Wild flower seed germination


Yellow bell flower seed germination

Yellow Evening Primrose seed germination

Sweet Corn Seed Germination


Sweet corn is an annual crop. Because corn is very susceptible to frosts, it’s best grown in the spring in a sunny and wind-protected area. It’s needed to regular water and weed corn, as the crops can suffer if they are deprived of water and soil nutrients.

SPECIFICATION OF
Common Name -Corn
Botanical Name- Zea Mays
How to Grow- Direct Sow
Planting Depth- 1.5 inches
Seed Spacing- 4-6 inches
Row Spacing- 30-36 inches
Space After- Thinning 8-12 inches
Days to Germination- 5-10
Days to Harvest- 60-90
Mature Height- 60-72 inches tall (5-6 feet)
Zones -1to 10


GERMINATION GUIDE

Use a flat tray like container about 10 inches by 15 inches (biggest or smaller your choice) 1.5 to 2 inches deep. Make sure you have plenty of holes in it for good water drainage - put the seedling mix you prepared up to almost top leaving about 0.5 inches space - now evenly spread the seeds over it after that cover the seeds with seedling mix only about 0.5 cm (half centimeter) - water it by watering can- place the container in semi shaded place. 


As prepare a planting mix with the sand, soil and  diluted fungicide water (2 gm in 1 litre water) after sowing the seeds. Make a hole in the potting mix with your  each seed in a hole as  the planted pots or flats in a warm, above 60F (15.5ºC), sunny  wet is quite dangerous for the seeds so keep the potting soil moist but not too wet until the seeds emerge, which should be in about 21 day cover the mixture with poly bag after 21 days  you can remove the plastic.

Sow Outdoors:  Following the last frost. Spacing 4 to 24 inches (10 to 60 cm).

Sow Indoors: Mix seeds in a growing medium, place in a freezer bag, keep moist, then stratify by refrigeration for two to three weeks. Use peat pots. Germination time: one to three weeks in the light. Temperature 75°F (24°C). Seven or eight weeks in advance. Transplant outdoors in the last month of spring.

Be sure when planting sweet corn that the soil is warm — at least above 55 F. (13 C.). If you plant super sweet corn, be sure the soil is at least 65 F. (18 C.), as super sweet corn prefers a warmer climate.

Read more at Gardening Know How: How To Grow Sweet Corn In The Garden http://www.gardeningknowhow.com/edible/vegetables/corn/grow-sweet-corn.htm

Important watering tips : Use watering can for watering. By moving the water stream constantly waves the can. Do not let the water to flood area. Or use sprayer to spray the water like mist
Be sure when planting sweet corn that the soil is warm .

USE & BENEFITS OF CORN:

According to Foods.org, sweet corn is very rich in vitamin B1, vitamin B5, vitamin C, phosphorus, manganese, fol-ate and dietary fiber.


1.To  remain young and maintain youthful looks, then you definitely have to consume sweet corn. It is a powerhouse of antioxidants useful in preventing the aging process.

2.Corn contains a lot of vitamin B12, iron, and folic acid. The deficiency of these nutrients can cause anemia. So, eating sweet corn can prevent anemia.

3.Sweet corn contains high levels of thiamine, or vitamin B1. According to WHFoods.org, thiamine is an essential nutrient required for brain cell and cognitive function.


Wednesday, 21 December 2016

Benefits of Growing LADY'S FINGER


Description:

Okra is better known by its common name as lady's finger or Gumbo. This  vegetable is known for its high soluble and insoluble fiber content. This vegetable is usually used in many recipes and is also a part of many nutritional diets, as it is beneficial to the heart. Let us quickly look at some of the key okra health benefits.


USES and BENEFITS OF LADY'S FINGER:

Ladies finger pods are rich in dietary fiber that controls cholesterol and constipation.Folic acid decreases the risk of neural birth defects in embryos.Okra is also a great source of Vitamin C that improves our body’s immunity levels.


1. Tender lady fingers are widely used to prepare pickles; after the completion of process its colour turns into yellow and softens.

2. In Japanese culture, slices of Lady finger is often served with sushi.

3. In Indian culture, variety of dishes are prepared using Lady finger like stuffed okra, okra fry, okra gravy and many more.


4. Raw okra is widely used due to its medicinal values; many also prefer it in the raw form .

5. It contains high amount of insoluble dietary fibers which helps in cleaning out the whole digestive system especially the intestinal tract thus it plays a great role in preventing from the colon cancer. It also reduces the risk of occurrence of other type of cancers in the body.

6. Okra is known to aid in prevention of diabetes. It is rich in Fiber which helps in the prevention of this disease.
3.It improves digestion process by regularizing the bowel movements.

7. Another important benefit of lady finger is that it contains Vitamin C which helps in improving immunity.

8. The Vitamin A and beta carotene present in lady finger may be helpful in improving eyesight.

9. It contains very low calorie and low sodium which are very much beneficial for the people tending to lose weight.

10. The dietary fiber content of okra/lady’s finger is known to be high, and hence, many health specialists recommend it for digestive benefits. The fibers aid the process of digestion in the body by facilitating proper bowel movement.

11. Vitamin K is a co-factor in the blood-clotting process. It also plays a major role in strengthening the bones in our body.